Making RabbitMQ Recover from (a)Mnesia

In the company I work for we’re using RabbitMQ to offload non-timecritical processing of tasks. To be able to recover in case RabbitMQ goes down our queues are durable and all our messages are marked as persistent. We generally have a very low number of messages in flight at any moment in time. There’s just one queue with a decent amount of them: the “failed messages” dump.

The Problem

It so happens that after a botched update to the most recent version of RabbitMQ (3.5.3 at the time) our admins had to nuke the server and install it from scratch. They had made a backup of RabbitMQ’s Mnesia database and I was tasked to recover the messages from it.
This is the story of how I did it.

Since our RabbitMQ was configured to persist all the messages this should be generally possible. Surely I wouldn’t be the first one to attempt this. ?

Looking through the Internet it seems there’s no way of ex/importing a node’s configuration if it’s not running. I couldn’t find any documentation on how to import a Mnesia backup into a new node or extract data from it into a usable form. ?

The Idea

My idea was to setup a virtual machine (running Debian Wheezy) with RabbitMQ and then to somehow make it read/recover and run the broken server’s database.

In the following you’ll see the following placeholders:

  • RABBITMQ_MNESIA_BASE will be
    /var/lib/rabbitmq/mnesia

      on Debian (see RabbitMQ’S file locations)

  • RABBITMQ_MNESIA_DIR is just $RABBITMQ_MNESIA_BASE/$RABBITMQ_NODENAME
  • BROKEN_NODENAME the $RABBITMQ_NODENAME of the broken server we have backups from
  • BROKEN_HOST the hostname of said server

One more thing before we start: if I say “fix permissions” below I mean

sudo chown -R rabbitmq:rabbitmq $RABBITMQ_MNESIA_DIR

1st Try

My first try was to just copy the broken node’s Mnesia files to the VM’s $RABBITMQ_MNESIA_DIR failed. The files contained node names that RabbitMQ tried to reach but were unreachable from the VM.

Error description:
   {could_not_start,rabbit,
       {{failed_to_cluster_with,
            ['$BROKEN_NODENAME'],
            "Mnesia could not connect to any nodes."},
        {rabbit,start,[normal,[]]}}}

So I tried to be a little bit more picky on what I copied.

First I had to reset $RABBITMQ_MNESIA_DIR by deleting it and have RabbitMQ recreate it. (I needed to do this way too many times ?)

sudo service rabbitmq-server stop
rm -r $RABBITMQ_MNESIA_DIR
sudo service rabbitmq-server start

Stopping RabbitMQ I tried to feed it the broken server’s data in piecemeal fashion. This time I only copied the

rabbit_*.[DCD,DCL]

  and restarted RabbitMQ.

RabbitMQ Management Interface lists all the queues, but the node it thinks they're on is "down"
RabbitMQ’s management interface lists all the queues, but it thinks the node they’re on is “down”

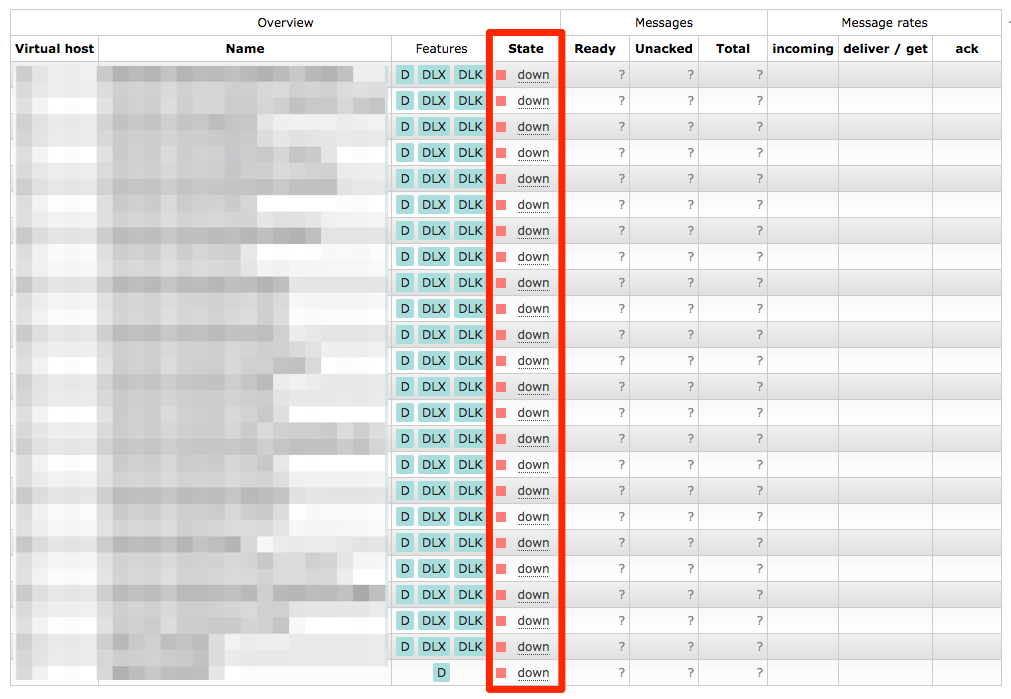
Looking at the web management interface there were all the queues we were missing, but they were “down” and clicking on them told you

The object you clicked on was not found; it may have been deleted on the server.

Copying any more data didn’t solve the issue. So this was a dead end. ?

2nd Try

So I thought why doesn’t the RabbitMQ in the VM pretend to be the exact same node as on the broken server?

So I created a

/etc/rabbitmq/rabbitmq-env.conf

  with

NODENAME=$BROKEN_NODENAME

  in there.

I copied the backup to $RABBITMQ_MNESIA_DIR (now with the new node name) and fixed the permissions.

Now starting RabbitMQ failed with

ERROR: epmd error for host $BROKEN_HOST: nxdomain (non-existing domain)

I edited

/etc/hosts

  to add $BROKEN_HOST to the list of names that resolve to 127.0.0.1.

Now restarting RabbitMQ failed with yet another error:

Error description:
   {could_not_start,rabbit,
       {{schema_integrity_check_failed,
            [{table_attributes_mismatch,rabbit_queue,
                 [name,durable,auto_delete,exclusive_owner,arguments,pid,
                  slave_pids,sync_slave_pids,recoverable_slaves,policy,
                  gm_pids,decorators,state],
                 [name,durable,auto_delete,exclusive_owner,arguments,pid,
                  slave_pids,sync_slave_pids,mirror_nodes,policy]}]},
        {rabbit,start,[normal,[]]}}}

Now what? Why don’t I try to give it the Mnesia files piece by piece again?

  • Reset $RABBITMQ_MNESIA_DIR
  • Stop RabbitMQ
  • Copy
    rabbit_*

      files in again and fix their permissions

  • Start RabbitMQ

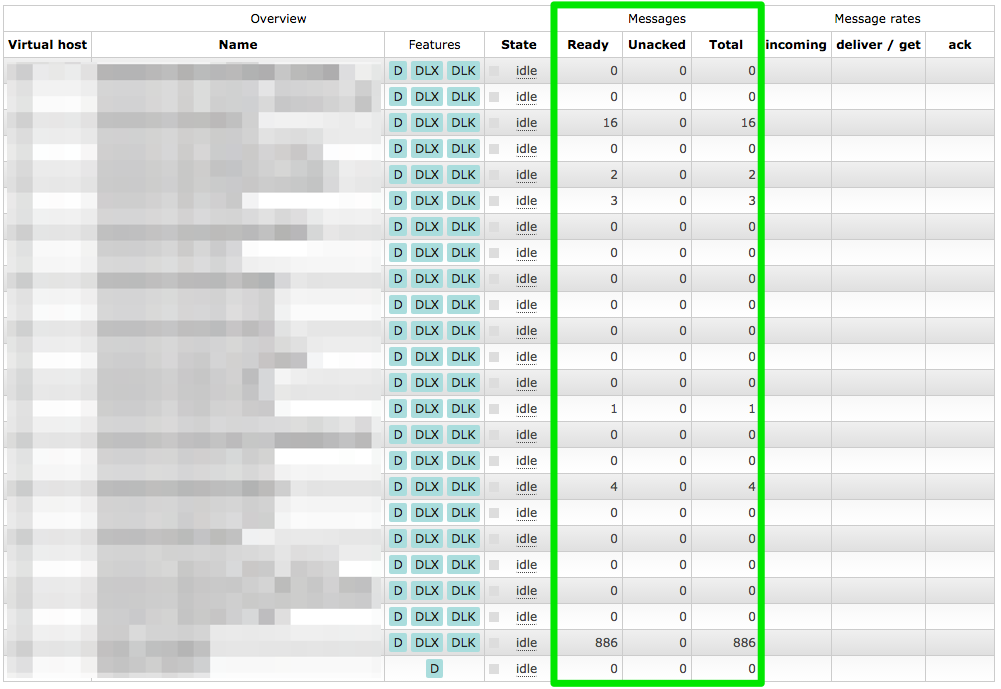
All our queues were back and all their configuration seemed OK as well. But we still didn’t have our messages back yet.

RabbitMQ Data Recovery Screen Shot 2 - Node Up, Queues Empty
The queues have been restored, but they have no messages in them

Solution

So I tried to copy more and more files over from the backup repeating the above steps. I finally reached my goal after copying

rabbit_*

 ,

msg_store_*

 ,

queues

  and

recovery.dets

. Fixing their permissions and starting RabbitMQ it had all the queues restored with all the messages in them. ?

RabbitMQ Data Recovery Screen Shot 3 - Messages Restored
Queues and messages restored

Now I could use ordinary methods to extract all the messages. Dumping all the messages and examining them they looked OK. Publishing the recovered messages to the new server I was pretty euphoric. ?

Gitify Your Life

Git was written to manage code, but Richard Hartmann presents a whole range of projects and tools that use Git for all sorts of things. 😀

From tracking personal notes to managing your website, wiki, and blog over tracking system and personal configuration files to managing videos, photos and other large files and making system backups, a lot of tools have been grown around the git ecosystem to help you support most tasks of your digital life. This talk will show you a lot of neat tools and tricks and it’s highly likely that you will adopt at least one of the various solutions.

http://youtu.be/Ln1Ri8kLzok

Watch it on YouTube or get it from the Debian Archives.

How to to set up Gitlab on Debian

Update: This howto is outdated. GitLab has changed a lot since it was written and a lot of it is not applicable anymore (e.g. since GitLab 5.0 it doesn’t depend on Gitolite any more and only needs one system user to be setup). So you are probably better off using the official installation guide. 🙂


If you want to install Gitlab on Debian you can easily follow their installation steps for Ubuntu. But be careful there are a few gotchas nobody is talking about.

The following steps will assume you are root.

Preparations

First make sure you have all the latest updates installed.

aptitude update
aptitude full-upgrade

Then we have to install a few packages.

aptitude install git-core wget curl gcc checkinstall libxml2-dev libxslt-dev sqlite3 libsqlite3-dev libcurl4-openssl-dev libc6-dev libssl-dev libmysql++-dev make build-essential zlib1g-dev libicu-dev redis-server sudo

Install Ruby

If you have not installed ruby you might want to consider using RVM.

Install it with

bash -s stable < <(curl -s https://raw.github.com/wayneeseguin/rvm/master/binscripts/rvm-installer)

It will be installed into /usr/local/rvm.

Ask it for the requirements for installing MRI and install them.

rvm requirements
aptitude install build-essentials ...

Install ruby and make it the default.

rvm install 1.9.3
rvm --default use 1.9.3

You should install a minimum set of gems. Add “passenger” if you are running Apache as your web server or “thin” if you are using Nginx.

gem install bundler

Install Gitolite

First of all we want to create a dedicated user for Gitolite and Gitlab. This will also be the user the Rails processes will be running in (this is important later).

adduser \
  --system \
 --shell /bin/sh \
 --gecos 'Git Version Control' \
 --group \
 --disabled-password \
 --home /home/git \
 git

Configure git for the new user.

sudo -u git -H git config --global user.email "git@your-server.tld"
sudo -u git -H git config --global user.name "Gitlab Admin"

Generate the ssh key for the git user. It will be saved in /home/git/.ssh/id_rsa. We will run Gitlab as the git user so it will use this key to authenticate against Gitolite.

sudo -u git -H ssh-keygen -t rsa -b 2048

Copy the public part of the key for later use when we setup Gitolite.

sudo -u git -H cp /home/git/.ssh/id_rsa.pub /home/git/rails.pub

After that we install Gitolite. In contrast to the Gitlab documentation I installed it from the Debian repositories.

aptitude install gitolite

It will not be fully installed as it will tell you something like:

No adminkey given – not initializing gitolite in /var/lib/gitolite.

So we do this by using dpkg-reconfigure and using our previously prepared account.
When prompted, answer as follows:

  • Gitolite user: git
  • repositories directory: /home/git
  • admin key: /home/git/rails.pub
dpkg-reconfigure gitolite

Now you should have Gitolite set up in the /home/git directory. But we will still have to tweak it a little.

Edit /home/git/.gitolite.rc and find the line that reads “REPO_UMASK = 0077;” and change it to “REPO_UMASK = 0007;” (i.e. three zeros).

You now need to change the directory privileges on the /repositories directory so Gitlab can use them

sudo chmod -R g+rwX /home/git/repositories/
sudo chown -R git:git /home/git/repositories/

Gitolite should be ready now.

You can test it by cloning the admin repository:

sudo -u git -H git clone git@localhost:gitolite-admin /tmp/gitolite-admin
rm -rf /tmp/gitolite-admin

Install Gitlab

Install a few prerequisites.

aptitude install python-dev python-pip redis-server libicu-dev
sudo pip install pygments

Clone Gitlab

git clone git://github.com/gitlabhq/gitlabhq.git gitlab
cd gitlab

We create a gemset for Gitlab to not pollute the global gemset. To automate this we will use a .rmvrc inside the Gitlab directory. RVM will make sure it will be loaded automatically whenever you enter the directory.

echo "rvm use 1.9.3@gitlab --create" > .rvmrc

cd into directory to make rvm use the .rvmrc and accept with “y”.

cd .. && cd gitlab

Check your current gemset with

rvm current

It should show something like “ruby-1.9.3-p0@gitlab”.

Now you might need to update Gitlab’s Gemfile (e.g. add the mysql2 gem for MySQL databases).

Now install the gems necessary for running Gitlab.

bundle install --deployment

You may need to run “bundle install –no-deployment” to pick up changes to the Gemfile and rerun the previous command.

Edit config/gitlab.yml to configure Gitlab. If you have followed this howto you should only need to update the “email” section and the “host” option in the “git_host” section.

You might want to edit config/application.rb and update the time zone and locale configurations.

Edit config/database.yml and set up your database configuration.

Now set up and initialize your database.

bundle exec rake db:setup RAILS_ENV=production
bundle exec rake db:seed_fu RAILS_ENV=production

Install with Passenger + Apache

(todo)

Install with Thin + Nginx

(todo)

Result

😀