If you’re an Ansible user and encounter the following error:
unix_listener: "..." too long for Unix domain socket
you need to set the control_path option in your ansible.cfg file to tell SSH to use shorter path names for the control socket. You should have a look at the ssh_config(5) man page (under
In the company I work for we’re using RabbitMQ to offload non-timecritical processing of tasks. To be able to recover in case RabbitMQ goes down our queues are durable and all our messages are marked as persistent. We generally have a very low number of messages in flight at any moment in time. There’s just one queue with a decent amount of them: the “failed messages” dump.
The Problem
It so happens that after a botched update to the most recent version of RabbitMQ (3.5.3 at the time) our admins had to nuke the server and install it from scratch. They had made a backup of RabbitMQ’s Mnesia database and I was tasked to recover the messages from it.
This is the story of how I did it.
Since our RabbitMQ was configured to persist all the messages this should be generally possible. Surely I wouldn’t be the first one to attempt this. ?
Looking through the Internet it seems there’s no way of ex/importing a node’s configuration if it’s not running. I couldn’t find any documentation on how to import a Mnesia backup into a new node or extract data from it into a usable form. ?
The Idea
My idea was to setup a virtual machine (running DebianWheezy) with RabbitMQ and then to somehow make it read/recover and run the broken server’s database.
In the following you’ll see the following placeholders:
My first try was to just copy the broken node’s Mnesia files to the VM’s $RABBITMQ_MNESIA_DIR failed. The files contained node names that RabbitMQ tried to reach but were unreachable from the VM.
Error description:
   {could_not_start,rabbit,
       {{failed_to_cluster_with,
            ['$BROKEN_NODENAME'],
            "Mnesia could not connect to any nodes."},
        {rabbit,start,[normal,[]]}}}
So I tried to be a little bit more picky on what I copied.
First I had to reset $RABBITMQ_MNESIA_DIR by deleting it and have RabbitMQ recreate it. (I needed to do this way too many times ?)
sudo service rabbitmq-server stop
rm -r $RABBITMQ_MNESIA_DIR
sudo service rabbitmq-server start
Stopping RabbitMQ I tried to feed it the broken server’s data in piecemeal fashion. This time I only copied the
rabbit_*.[DCD,DCL]
and restarted RabbitMQ.
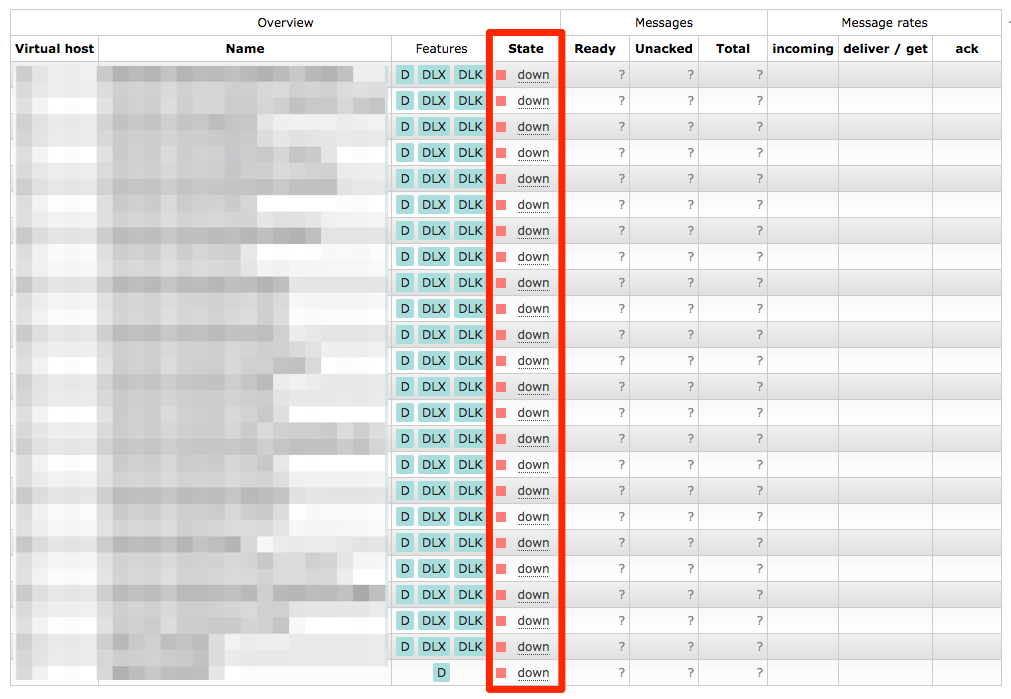
RabbitMQ’s management interface lists all the queues, but it thinks the node they’re on is “down”
Looking at the web management interface there were all the queues we were missing, but they were “down” and clicking on them told you
The object you clicked on was not found; it may have been deleted on the server.
Copying any more data didn’t solve the issue. So this was a dead end. ?
2nd Try
So I thought why doesn’t the RabbitMQ in the VM pretend to be the exact same node as on the broken server?
So I created a
/etc/rabbitmq/rabbitmq-env.conf
with
NODENAME=$BROKEN_NODENAME
in there.
I copied the backup to $RABBITMQ_MNESIA_DIR (now with the new node name) and fixed the permissions.
Now starting RabbitMQ failed with
ERROR: epmd error for host $BROKEN_HOST: nxdomain (non-existing domain)
I edited
/etc/hosts
to add $BROKEN_HOST to the list of names that resolve to 127.0.0.1.
Now restarting RabbitMQ failed with yet another error:
Now what? Why don’t I try to give it the Mnesia files piece by piece again?
Reset $RABBITMQ_MNESIA_DIR
Stop RabbitMQ
Copy
rabbit_*
files in again and fix their permissions
Start RabbitMQ
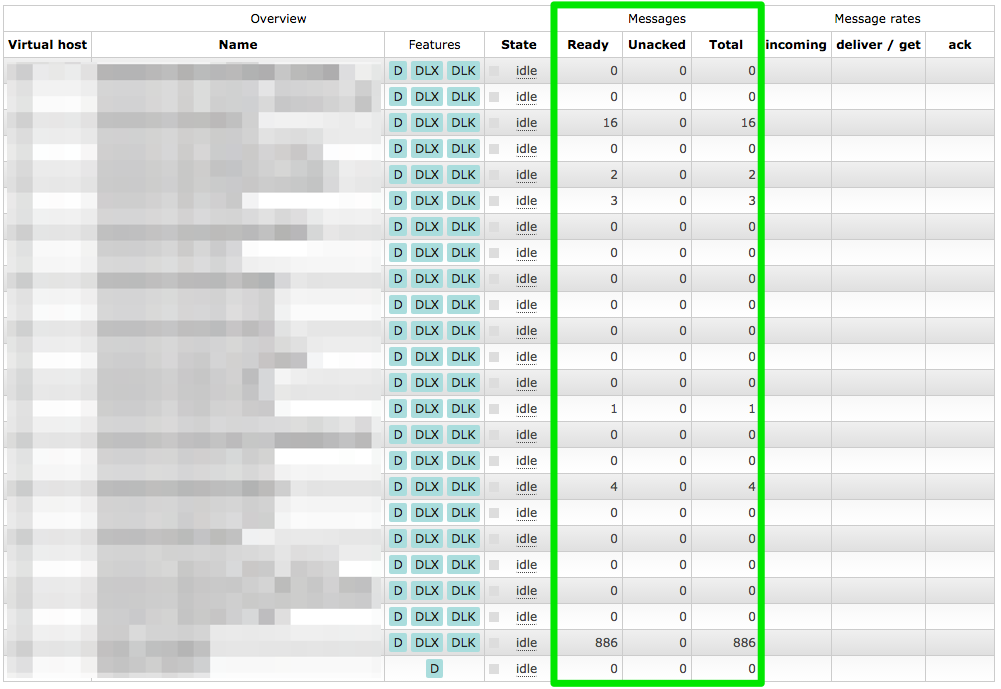
All our queues were back and all their configuration seemed OK as well. But we still didn’t have our messages back yet.
The queues have been restored, but they have no messages in them
Solution
So I tried to copy more and more files over from the backup repeating the above steps. I finally reached my goal after copying
rabbit_*
,
msg_store_*
,
queues
and
recovery.dets
. Fixing their permissions and starting RabbitMQ it had all the queues restored with all the messages in them. ?
Queues and messages restored
Now I could use ordinary methods to extract all the messages. Dumping all the messages and examining them they looked OK. Publishing the recovered messages to the new server I was pretty euphoric. ?
Sometimes well-intentioned features have unintended side effects. Case in point: WordPress’ maintenance mode. Whenever you update plugins WP will automatically enter maintenance mode, which displays a nice message to your visitors that the site will be back online shortly. It will automatically go out of maintenance once the updates are done.
Well, sometimes unexpected things happen: you are stuck in maintenance mode. WP will effectively lock you out … even the admin section will not be accessible. *ugh* This is the moment you start panicking … luckily if you wait 10 minutes or delete the .maintenance file manually you’ll be able to access your site again. *phew*
I recently finished introducing custom CA infrastructure in two instances. Each having two sub CAs, two Servers and a bunch of users. The “create your own CA” part was quite easy after I found a dated but still accurate tutorial. In hindsight it is quite silly why I didn’t do this before.
On the server side I had to make it work on:
Apache
Nginx
Postfix
Cyrus
Dovecot
Each expecting its own Format/Packing of certificates, keys and certificate chains. :/
On the client side I had to produce installation and configuration howtos for Windows and OS X and a bunch of popular browsers and email clients. Then there is the “user education” part … this is still in progress, but its looking good.