Routing My Way Out With IPv6: NPT6

This article is part of a series of how I built a WireGuard tunnel for getting IPv6 connectivity. Where the last step was to figure out how to route packets from devices in my private network through the WireGuard tunnel to the Internet.

I’ve explored three different methods for solving this:

I’ll try to show how to set each of them up and try to convey their pros and cons.

TL;DR

You should always consider IPv6-PD first!

Consider any other option only if:

  • you have a “weird” setup or want to support an esoteric use case (like I do e.g. with too many local subnets for too long a public prefix)
  • you’re willing to set up, debug and maintain a somewhat experimental configuration
  • you more or less understand the tradeoffs
  • all of the above!

Starting Point

I’ll assume the following has been set up:

  • default OpenWRT networks named “LAN”, “WAN”, “WAN6”
  • default OpenWRT firewall rules
  • an ULA prefix of fd00:11:22::/48
  • an IPv6 WireGuard tunnel with the endpoint on our OpenWRT router being 2000:30:40:50::2
  • the remote WireGurad tunnel end point forwards the whole 2000:30:40:50::/64 to our OpenWRT router

NPTv6 (Network Prefix Translation)

This is probably the least publicly documented method of all. Discussions and tutorials are scarce. Its use cases are esoteric and probably better solved in other ways. But it’s the most interesting method, because it’s conceptually even simpler than NAT6, but only viable with IPv6 addresses.

NPT basically means that you swap the prefix part of an IPv6 address with another same-sized prefix. It exploits two facts about IPv6 addresses. The first one is that prefixes can be at most 64 bits long (i.e. for a /64) leaving the interface identifier (i.e. the second half of the IPv6 address) untouched. The second one is that interface identifiers are basically random (i.e. because they’re either derived from (globally) unique MAC addresses or they’re randomly generated temporary addresses) and hence won’t clash. This allows for stateless, NAT-like behavior (i.e.without the “expensive” tracking of NATed connections).

You can configure NPT to be bidirectional which maps prefixes in both directions basically creating a 1:1 mapping. If you’re doing this you’re probably better off just announcing multiple prefixes to your devices or creating custom routes to bridge two networks.

An even more esoteric use case is when you create one or more unidirectional mappings allowing you to multiplex multiple networks onto one. This works great, because the interface identifiers are basically random and can be left as they are. In my tests having one-way mappings still managed to route the responses correctly although strictly speaking it shouldn’t. 🀨 I suspect that this worked accidentally, because of the standard firewall “conntrack” (i.e. connection tracking) rules. πŸ€”

Setup

On the “Network > Interfaces” page edit the “WAN6” interface and set “Protocol” to “unmanaged”. And make sure the “WAN6_WG” addresses say 2000:30:40:50::2/64 (note the /64 at the end).

Similar to the NAT6 case we need a custom firewall script. You have to install the iptables-mod-nat-extra package. I’ve created a Gist for the script. Save it to /etc/firewall.npt6 and instruct the firewall to run it when being reloaded by adding the following section to /etc/config/firewall:

config include 'npt6'
        option path '/etc/firewall.npt6'
        option reload '1'

After restarting the firewall with /etc/init.d/firewall restart you should be good to go.

As described at the top of the firewall script you can configure mappings by adding npt6 config sections to /etc/config/firewall (sorry, there’s no UI for this πŸ˜…).

config npt6
        option src_interface 'lan'
        option dest_interface 'wan6_wg'
        option output '1'

This is the minimal setup. Just add more sections for more source and destination network pairs. Run /etc/init.d/firewall reload to apply new configurations.

In my tests all devices could connect to IPv6 services on the internet without problems. But devices always preferred IPv4 connections over IPv6 ones. This was tricky to solve, but it comes down to this:

When a domain has both public/global IPv4 and IPv6 addresses your devices tries to determine how to connect to it. It’ll generally prefer IPv6 over IPv4, but actually its more complicated than that. All IPv4 addresses are treated as global during address selection while IPv6 addresses are classified differently depending on the prefix. It just so happens that from the outside it looks something like this: global IPv6 address > IPv4 addresses > IPv6 ULAs. It’s a little more complicated

Since we don’t have a global IPv6 address, IPv4 is preferred assuming that private IPv4 addresses will generally be NATed to the Internet while ULA prefixes won’t. 😞

This was tricky to solve. All related questions on the Internet revolved around how to prefer IPv4 over IPv6, but the solution was not invertible. It boils down to changing /etc/gai.conf to classify your ULA prefix the same as a global ones. You can accomplish this by adding a label line for your ULA (i.e. fd00:11:22::/48 here) and giving it the same label (i.e. the last number on the line) as the line with ::/0 (i.e. 1 here for me). Finding this out took me a week of trial and error until I resigned to doing the address selection algorithm by hand. πŸ˜…

I had to uncomment all the label configuration lines and then add my custom line, because once you add a custom rule all the default ones will be reset. So to add a rule on top of the default ones I ended up with the following (note that I only added the last line, all others were part of Ubuntu’s default configuration):

...
label ::1/128       0
label ::/0          1
label 2002::/16     2
label ::/96         3
label ::ffff:0:0/96 4
label fec0::/10     5
label fc00::/7      6
label 2001:0::/32   7
label fd00:11:22::/48 1
...

I only added my network’s ULA to preserve the default behavior as much as possible and only make an exception for my network specifically. so this will change the behavior only when the device has addresses from this specific ULA.

You have to restart applications for them to pick up changes to /etc/gai.conf.

Pros

  • multiple internal networks can be multiplexed onto one upstream network (even when the upstream prefix is too long (e.g. for IPv6-PD))
  • internal devices are not directly reachable from the Internet (with unidirectional mapping) (this is not a replacement for a firewall!)

Cons

  • very little documentation and online resources
  • for your devices to use IPv6 by default you have to muck with address selection preferences on each and every one of them
  • it doesn’t fall back to IPv4 when the IPv6 tunnel goes down

Routing My Way Out With IPv6: NAT6

This article is part of a series of how I built a WireGuard tunnel for getting IPv6 connectivity. Where the last step was to figure out how to route packets from devices in my private network through the WireGuard tunnel to the Internet.

I’ve explored three different methods for solving this:

I’ll try to show how to set each of them up and try to convey their pros and cons.

TL;DR

You should always consider IPv6-PD first!

Consider any other option only if:

  • you have a “weird” setup or want to support an esoteric use case (like I do e.g. with too many local subnets for too long a public prefix)
  • you’re willing to set up, debug and maintain a somewhat experimental configuration
  • you more or less understand the tradeoffs
  • all of the above!

Starting Point

I’ll assume the following has been set up:

  • default OpenWRT networks named “LAN”, “WAN”, “WAN6”
  • default OpenWRT firewall rules
  • an IPv6 WireGuard tunnel with the endpoint on our OpenWRT router being 2000:30:40:50::2
  • the remote WireGuard tunnel end point forwards the whole 2000:30:40:50::/64 to our OpenWRT router

NAT6 a.k.a. Masquerading

NAT6 is basically a rehash of the “the old way” of using NAT for the IPv4 Internet. The router/gateway replaces the internal source (i.e. sender) address of a packet going out with its own public address. The router makes note of original sender and recipient to be able to reverse the process when an answer comes back. When the router receives a packet it forwards it to the actual recipient by replacing the destination address with the internal address of original sender.

Setup

On the “Network > Interfaces” page edit the “WAN6” interface and set “Protocol” to “unmanaged”. Then follow the OpenWRT NAT6 and IPv6 Masquerading documentation.

In my tests the masq6_privacy setting had no impact. All outgoing packages always had an address of 2000:30:40:50::2 (i.e. the router’s WireGuard interface address). πŸ˜• It seems using WireGuard interferes with OpenWRT’s ability to generate temporary addresses for the interface. No amount of fiddling (e.g. setting addresses with /64, suffixes to “random”, setting prefix filters, setting a delegatable prefix, but disabling delegation, … I really got desperate) on the “WAN6_WG” interfaces’ settings or creating a “WAN6” alias and doing the same to it made the temporary addresses work. 😡 You could manually add addresses with random suffixes to the WireGuard interface … maybe even write a script that changes them periodically … πŸ˜…πŸ˜πŸ˜ž

Pros

  • multiple internal networks can be multiplexed onto one upstream network (even when the upstream prefix is too long (e.g. for IPv6-PD))
  • internal devices are not directly reachable from the Internet (this is not a replacement for a firewall!)

Cons

  • connections can only be started from internal devices
  • router needs to keep state for every connection
  • router needs to touch/manipulate every packet
  • you only have one static external address, because it seems temporary addresses (i.e. IPv6 privacy extensions) don’t work with WireGuard connections

Routing My Way Out With IPv6: IPv6-PD

Since I wrote my blog post about using a WireGuard tunnel for getting IPv6 connectivity there was one thing that was bugging me immensely: having to use NAT for IPv6. πŸ˜“

My initial howto used a private network for the WireGuard VPN which led to having two translation steps: one when entering the WireGuard VPN and one when exiting. I later realized I could use the global /64 assigned to the cloud VPN endpoint for the WireGuard VPN itself and just forward all traffic to and from it on the cloud VPN endpoint. This was easy, because the address mapping was 1:1 (cloud server’s /64 ⇔ WireGuard VPNs /64). This eliminated one translation.

The second translation (i.e. the one on the OpenWRT router) is more difficult to remove. The crux of the matter is that I only have a /64 for the tunnel which means I either have to select which internal network gets to be connected or I have to “multiplex” multiple internal /64s onto one upstream /64.

I’ve explored three different methods for solving this:

I’ll try to show how to set each of them up and try to convey their pros and cons.

TL;DR

You should always consider IPv6-PD first!

Consider any other option only if:

  • you have a “weird” setup or want to support an esoteric use case (like I do e.g. with too many local subnets for too long a public prefix)
  • you’re willing to set up, debug and maintain a somewhat experimental configuration
  • you more or less understand the tradeoffs
  • all of the above!

Starting Point

I’ll assume the following has been set up:

  • default OpenWRT networks named “LAN”, “WAN”, “WAN6”
  • default OpenWRT firewall rules
  • an IPv6 WireGuard tunnel with the endpoint on our OpenWRT router being 2000:30:40:50::2
  • the remote WireGurad tunnel end point forwards the whole 2000:30:40:50::/64 to our OpenWRT router

IPv6-PD (Prefix Delegation)

IPv6-PD (i.e. prefix delegation) is basically the built-in mechanism of sharing global IPv6 addresses with internal networks. As the word “delegation” implies you give away (a portion/sub-prefixes) to “downstream” networks. This also implies that if you get a long global prefix you may not be able to partition it for delegating it to (all) your internal networks. Normally you’ll get something like a /56 from your ISP, but I only have a /64, because I “hijacked” a cloud server’s addresses.

Setup

On the “Network > Interfaces” page edit the “WAN6” interface:

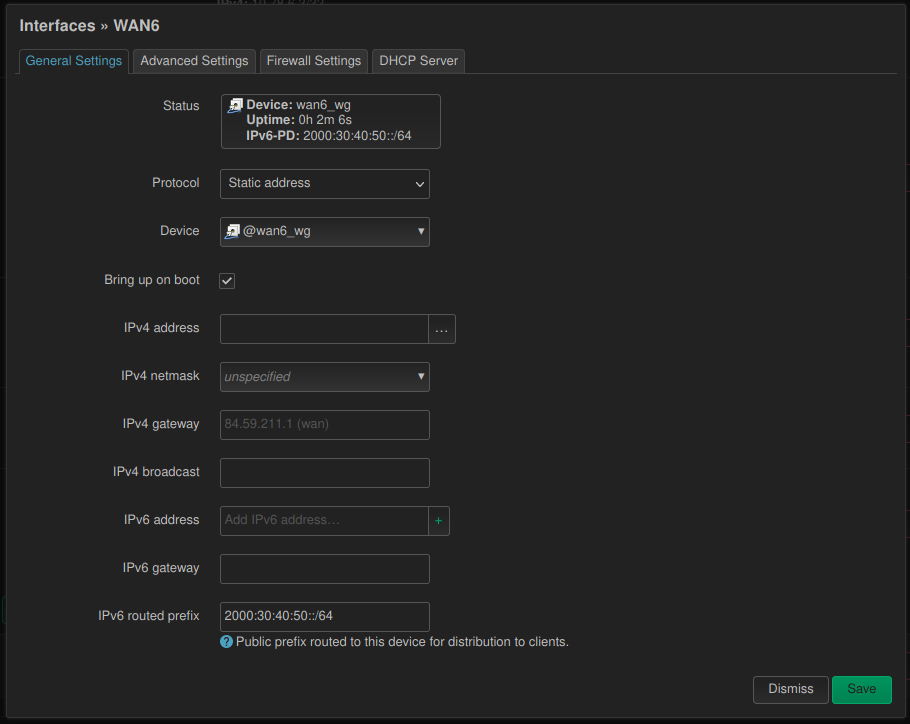
OpenWRT – WAN6 Interface: General Settings (for IPv6-PD)
  • Set “Protocol” to “static”.
  • Set “Device” to “Alias interface: @wan6_wg”.
  • Set “IPv6 routed prefix” to the WireGuard public prefix (i.e. 2000:30:40:50::/64 in our case).
  • Make sure that in the “Advanced Settings” tab “Delegate IPv6 prefixes” is enabled.

After saving and applying those settings the “Network > Interfaces” page should look like the following screenshot.

OpenWRT – Resulting WAN6 Interfaces in Overview (for IPv6-PD)

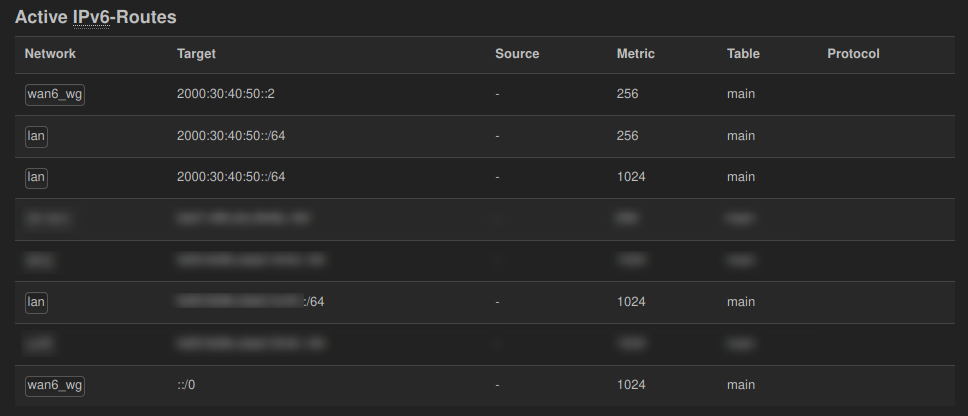
Make sure that your WireGuard interface has its address set to 2000:30:40:50::2/128. If you have something like 2000:30:40:50::2/64 (note the /64) set as described in an earlier version of the previous how-to you’ll get the same /64 route for both the “WAN6” and the “WAN6_WG” interfaces. In my case packets from the “LAN” network would reach the Internet correctly, but the responses would arrive at the OpenWRT router’s WireGuard interface but never turn up in the “LAN” network. The following screenshot shows a working configuration on the “Status > Routes” page.

OpenWRT – Active IPv6 Routes (for IPv6-PD)

Pros

  • simple, built-in
  • devices can “directly” connect to the Internet (“no NAT, no nothin”; see below)
  • middleware boxes don’t need to keep state (it’s all just routing)
  • few things can break

Cons

  • your global prefix needs a short enough to be useful (i.e. shorter than /64)
  • internal devices have a routable address reachable from the Internet (i.e. your firewall should deny incoming connections from the Internet by default)

My First Container-based Postgres Upgrade

Yesterday I did my first container-based PostgreSQL version upgrade. In my case the upgrade was from version 13 to 14. In hindsight I was quite naΓ―ve. πŸ˜…

I was always wondering why distros kept separate data directories for different versions … now I know: you can’t do in-place upgrades with PostgreSQL. You need to have separate data directories as well as both version’s binaries. 😡 Distros have their mechanisms for it, but in the container world you’re kind of on your own.

Well not really … it’s just different. I found there’s a project that specializes in exactly the tooling part of the upgrade. After a little trial an error (see below) it went quite smoothly.

Procedure

In the end it came down to the following steps:

  1. Stop the old postgres container.
  2. Backup the old data directory (yay ZFS snapshots).
  3. Create the new postgres container (with a new data directory; in my case via Ansible)
  4. Stop the new postgres container.
  5. Run the upgrade. (see command below)
  6. Start the new postgres container.
  7. Run vacuumdb as suggested at the end of the upgrade. (see command below)

The Upgrade Command

I used the tianon/postgres-upgrade container for the upgrade. Since my directory layout didn’t follow the “default” structure I had to mount each version’s data directory separately.

docker run --rm \
-e POSTGRES_INITDB_ARGS="--no-locale --encoding=UTF8" \
-v /tmp/pg_upgrade:/var/lib/postgresql \
-v /tank/containers/postgres-13:/var/lib/postgresql/13/data \
-v /tank/containers/postgres-14:/var/lib/postgresql/14/data \
tianon/postgres-upgrade:13-to-14

I set the POSTGRES_INITDB_ARGS to what I used when creating the new Postgres container’s data directory. This shouldn’t be necessary because we let the new Postgres container initialize the data directory. (see below) I left it in just to be safe. 🀷

I explicitly mounted something to the container’s /var/lib/postgresql directory in order to have access to the upgrade logs which are mentioned in error messages. (see below)

The Vacuumdb Command

Upgrading finishes with a suggestion like:

Upgrade Complete
—————-
Optimizer statistics are not transferred by pg_upgrade.
Once you start the new server, consider running:
/usr/lib/postgresql/14/bin/vacuumdb –all –analyze-in-stages

We can run the command in the new Postgres container:

docker exec postgres vacuumdb -U postgres --all --analyze-in-stages

We use the postgres user, because we didn’t specify a POSTGRES_USER when creating the database container.

Pitfalls

When you’re not using the default directory structure there’re some pitfalls. Mounting the two versions’ data directories separately is easy enough … it says so in the README. It’s what it doesn’t say that makes it more difficult than necessary. 😞

Errors When Initializing the New Data Directory

The first error I encountered was that the new data directory would get initialized with the default initdb options. where I used an optimized cargo-culted incantation which was incompatible (in my case --no-locale --encoding=UTF8). The upgrade failed with the following error:

lc_collate values for database “postgres” do not match: old “C”, new “en_US.utf8”

So I made sure I created the new database container (with the correct initdb args) before the migration fixed this.

Extra Mounts for the Upgrade

What tripped me really up was that when something failed it said to look into a specific log file which I couldn’t find. 🀨 I had to also mount something to the /var/lib/postgres directory which then had all the upgrade log files. πŸ˜”

This also solved another of my problems where the upgrade tool wanted to start an instance of the Postgres database, but failed because it couldn’t find a specific socket … which also happens to be located in the directory mentioned above.

Authentication Errors After Upgrade

After the upgrade I had a lot of authentication errors although non of the passwords should have changed.

FATAL: password authentication failed for user “nextcloud”

After digging through the internet and comparing both the old and new data directories it looked like the password hashing method changed. It changed from md5 to scram-sha-256 (in pg_ hda.conf the line saying host all all all scram-sha-256). πŸ˜‘Just re-setting (i.e. setting the same passwords again) via ALTER ROLE foo SET PASSWORD '...'; on all users fixed the issue.🀐

Using Posteo With Custom Domains

I tried to find out if you can use Posteo with a custom domain. And the short answer is: no.

Andy Schwartzmeyer found out the long answer. πŸ‘πŸ˜€ I implemented it for my blog and so far I’m happy. Interestingly enough it’s the receiving side that needs an external service. I currently use Forward Email‘s free tier, because I already have publicly known email addresses that I automatically collect emails from.

I always had the impression that sending mails is made more difficult in order to combat spammers, but what do I know. 🀷 Sending only needs to include Posteo in the SPF rules and adding a sender identity (usable after a one week cool down πŸ™ˆ).

List all processes and how much swap they use

Sometimes I see that my computer uses a lot of swap space, but none of the system monitors (e.g. ps, Gnome’s System Monitor, top, btop) show which processes are to blame. There’re several memory metrics (e.g. total swap usage), but never per process swap usage. 😠

There’s a StackExchange question that asks the same thing, but the solutions are all not well scripted, slow or “meh” for other reasons … so I tackled the problem myself. 😝

All the information is basically buried in the /proc/*/status files. Among other things they contain the amount of swap a process uses, its PID and even better: its name. So we have to go through all the files, grep the useful lines, extract the data from those lines and recombine them.

I tried different combinations of grep and sed and Bash string interpolation … and while it worked, it was even slower than the StackExchange suggestions. πŸ˜―πŸ˜…πŸ˜ž This looked more and more like a “if I knew grep/sed/awk better I wouldn’t need to invoke 4 sub shells/pipes/processes for each file” kind of problem. I remembered Bryan Cantrill making an offhanded remark once that awk had a simple and concise language and a great manual.

If you get the awk programming language manual…you’ll read it in about two hours and then you’re done. That’s it. You know all of awk.

Bryan Cantrill

I had put off diving in for too long. So I started reading and roughly 20 minutes in I knew enough to solve the whole problem (almost) entirely in awk (it still needs the shell for filename globbing πŸ˜•πŸ€·). And … it’s blazingly fast! And … you can also combine it with sort and head to quickly find the worst offenders. 😎

You can find the code in this Gist. There’s a simpler version in an earlier revision. πŸ˜‰

Skip unreadable files in awk scripts

Have you ever needed to give awk multiple files to process, but wanted it to skip files that it can’t open? Use this snippet!

BEGINFILE {
    # skip files that cannot be opened
    if ( ERRNO != "" ) {
        nextfile
    }
}

This trick is mentioned in the documentation for the BEGINFILE pattern, but not spelled out as code. You’re welcome. πŸ˜€

Solved: Regular WiFi Disconnections

After upgrading to Ubuntu 21.10 I noticed that my WiFi was disconnecting semi-regularly and trying to reconnect multiple times without success until after roughly 1 minute it was connected again. I’ve never had this kind of issues even after switching to iwd several years back.

Trying to find out what was happening I looked into my WiFi daemons logs with journalctl -eu iwd. Around the time a disconnect happened there were roughly 30 lines each 1-2 seconds apart all saying:

Received Deauthentication event, reason: 4, from_ap: false

There was no other information warning or error. The timings between these blocks are not always consistent. Mostly it’s 2 hours or 2 hours 15 minutes.

NetworkManager’s logs only had this to say (also repeated multiple times):

device (wlan0): new IWD device state is disconnected
device (wlan0): state change: activated -> failed (reason 'supplicant-disconnect', sys-iface-state: 'managed')
manager: NetworkManager state is now DISCONNECTED
device (wlan0): Activation: failed for connection '<SSID>'
device (wlan0): state change: failed -> disconnected (reason 'none', sys-iface-state: 'managed')
dhcp4 (wlan0): canceled DHCP transaction
dhcp4 (wlan0): state changed bound -> terminated
dhcp6 (wlan0): canceled DHCP transaction
dhcp6 (wlan0): state changed bound -> terminated
device (wlan0): new IWD device state is connecting
device (wlan0): Activation: starting connection '<SSID>' (<UUID>)
device (wlan0): state change: disconnected -> prepare (reason 'none', sys-iface-state: 'managed')
manager: NetworkManager state is now CONNECTING
device (wlan0): state change: prepare -> config (reason 'none', sys-iface-state: 'managed')
device (wlan0): new IWD device state is connected
device (wlan0): state change: config -> ip-config (reason 'none', sys-iface-state: 'managed')
dhcp4 (wlan0): activation: beginning transaction (timeout in 45 seconds)
dhcp4 (wlan0): state changed unknown -> bound, address=<IP ADDRESS>
device (wlan0): state change: ip-config -> ip-check (reason 'none', sys-iface-state: 'managed')
device (wlan0): state change: ip-check -> secondaries (reason 'none', sys-iface-state: 'managed')
device (wlan0): state change: secondaries -> activated (reason 'none', sys-iface-state: 'managed')
manager: NetworkManager state is now CONNECTED_LOCAL
manager: NetworkManager state is now CONNECTED_SITE
policy: set '<SSID>' (wlan0) as default for IPv4 routing and DNS
device (wlan0): Activation: successful, device activated.
manager: NetworkManager state is now CONNECTED_GLOBAL

I tried to search the internet for the error message from iwd, but nothing useful came up. Just forum posts with random suggestions like “turn off IPv6” and old kernel bug reports about the Intel wireless drivers exhibiting similar disconnections. 😞

I tried to look up what a modern setup + configuration should look like and tried to combine the guides from Ubuntu and Arch … no change.

The Gentoo Wiki and the iwd Wiki also suggest (wifi.iwd.autoconnect=yes) for NetworkManager. After applying this setting the issue seems to have gone away. πŸ˜€

Update 2021-10-31

The last “fix” only lasted for about 9 hours. πŸ˜•

I’m now suspecting something with power management πŸ€” … I’m still investigating.

Update 2021-11-26

I have a configuration that seems to work for a few weeks now. My final system state was adding

[device]
wifi.backend=iwd
wifi.iwd.autoconnect=yes

to NetworkManager’s configuration, masking wpa_supplicant.service, commenting out the contents of /etc/NetworkManager/conf.d/default-wifi-powersave-on.conf, installing all recommended packages for TLP (i.e. also tlp-rdw) and finally masking Gnome 40’s new power-profiles-daemon.service which seems to interfere with TLP.

I’m not sure if this is the minimal set of changes necessary, but it works for me. πŸ˜€ It first started showing the dis-/reconnection notification, but e.g. SSH connections didn’t seem to drop and after a while even the notifications stopped. Logs are also clean. I’m happy. πŸ˜€

X: the dumbest OS you’ve ever seen

For future reference: Daniel Stone dispels myths about “great” X is and why it’s actually former X maintainers that designed and implemented Wayland.

Aktivieren Sie JavaScript um das Video zu sehen.
https://www.youtube.com/watch?v=GWQh_DmDLKQ

Howto Restore ZFS Encryption Hierarchies

Backing up encrypted ZFS datasets you’ll see that ZFS breaks up the encryption hierarchy. The backed up datasets will look like they’ve all been encrypted separately. You can still use the (same) original key to unlock all the datasets, but you’ll have to unlock them separately. 😐

This howto should help you bring them back together when you have to restore from a backup.

Assuming we’ve created a new and encrypted pool to restore the previous backup to (I’ll call it new_rpool). We send our data from the backup pool to new_rpool.

sudo zfs send -w -v backup/laptop/rpool/ROOT@zrepl_20210131_223653_000 | sudo zfs receive -v new_rpool/ROOT
sudo zfs send -w -v backup/laptop/rpool/ROOT/ubuntu@zrepl_20210402_113057_000 | sudo zfs receive -v new_rpool/ROOT/ubuntu
[...]

Note that we’re using zfs send -w which sends the encrypted blocks “as is” from the backup pool to new_pool. This means that these datasets can only be decrypted with the key they were originally encrypted with.

Also note that you cannot restore an encrypted root/pool dataset with another encrypted one: i.e. we can’t restore the contents/snapshots of rpool to new_rpool (at least not without decrypting them first on the sender, sending them unencrypted and reencrypting them upon receive). Luckily for me that dataset is empty. 😎

Anyway … our new pool should look something like this now:

$ zfs list -o name,encryption,keystatus,keyformat,keylocation,encryptionroot -t filesystem,volume -r new_rpool
NAME                   ENCRYPTION   KEYSTATUS    KEYFORMAT   KEYLOCATION  ENCROOT
new_rpool              aes-256-gcm  available    passphrase  prompt       new_rpool
new_rpool/ROOT         aes-256-gcm  unavailable  raw         prompt       new_rpool/ROOT
new_rpool/ROOT/ubuntu  aes-256-gcm  unavailable  raw         prompt       new_rpool/ROOT/ubuntu
[...]

Note that each dataset is treated as it is encrypted by itself (visible in the encryptionroot property). To restore our ability to unlock all datasets with a single key we’ll have to to some work.

First we have to unlock each of these datasets. We can do this with the zfs load-key command (my data was encrypted using a raw key in a file, hence the -L file:///...):

sudo zfs load-key -L file:///tmp/backup.key new_rpool/ROOT
sudo zfs load-key -L file:///tmp/backup.key new_rpool/ROOT/ubuntu
[...]

Although zfs load-key is supposed to have a -r option that works when keylocation=prompt it fails for me with the following error message 🀨:

sudo zfs load-key -r -L file:///tmp/backup.key new_rpool/ROOT

alternate keylocation may only be 'prompt' with -r or -a
usage:
        load-key [-rn] [-L <keylocation>] <-a | filesystem|volume>


For the property list, run: zfs set|get


For the delegated permission list, run: zfs allow|unallow

The keystatus should have changed to available now:

$ zfs list -o name,encryption,keystatus,keyformat,keylocation,encryptionroot -t filesystem,volume -r new_rpool
NAME                   ENCRYPTION   KEYSTATUS    KEYFORMAT   KEYLOCATION  ENCROOT
new_rpool              aes-256-gcm  available    passphrase  prompt       new_rpool
new_rpool/ROOT         aes-256-gcm  available    raw         prompt       new_rpool/ROOT
new_rpool/ROOT/ubuntu  aes-256-gcm  available    raw         prompt       new_rpool/ROOT/ubuntu
[...]

We can now change the encryption keys and hierarchy by inheriting them (similar to regular dataset properties):

sudo zfs change-key -l -i new_rpool/ROOT
sudo zfs change-key -l -i new_rpool/ROOT/ubuntu
[...]

When we list our encryption properties now we can see that all the datasets have the same encryptionroot. This means that unlocking it unlocks all the other datasets as well. πŸŽ‰

$ zfs list -o name,encryption,keystatus,keyformat,keylocation,encryptionroot -t filesystem,volume -r new_rpool
NAME                   ENCRYPTION   KEYSTATUS    KEYFORMAT   KEYLOCATION  ENCROOT
new_rpool              aes-256-gcm  available    passphrase  prompt       new_rpool
new_rpool/ROOT         aes-256-gcm  available    passphrase  none         new_rpool
new_rpool/ROOT/ubuntu  aes-256-gcm  available    passphrase  none         new_rpool
[...]

Restoring Dataset Properties

This howto doesn’t touch restoring dataset properties, because I’ve not been able to reliably backup dataset properties using the -p and -b options of zfs send. Therefore I make sure that I have a (manual) backup of the dataset properties with something like `zfs get all -s local > zfs_all_local_properties_$(date -Iminutes).txt`