Solved: Regular WiFi Disconnections

After upgrading to Ubuntu 21.10 I noticed that my WiFi was disconnecting semi-regularly and trying to reconnect multiple times without success until after roughly 1 minute it was connected again. I’ve never had this kind of issues even after switching to iwd several years back.

Trying to find out what was happening I looked into my WiFi daemons logs with journalctl -eu iwd. Around the time a disconnect happened there were roughly 30 lines each 1-2 seconds apart all saying:

Received Deauthentication event, reason: 4, from_ap: false

There was no other information warning or error. The timings between these blocks are not always consistent. Mostly it’s 2 hours or 2 hours 15 minutes.

NetworkManager’s logs only had this to say (also repeated multiple times):

device (wlan0): new IWD device state is disconnected
device (wlan0): state change: activated -> failed (reason 'supplicant-disconnect', sys-iface-state: 'managed')
manager: NetworkManager state is now DISCONNECTED
device (wlan0): Activation: failed for connection '<SSID>'
device (wlan0): state change: failed -> disconnected (reason 'none', sys-iface-state: 'managed')
dhcp4 (wlan0): canceled DHCP transaction
dhcp4 (wlan0): state changed bound -> terminated
dhcp6 (wlan0): canceled DHCP transaction
dhcp6 (wlan0): state changed bound -> terminated
device (wlan0): new IWD device state is connecting
device (wlan0): Activation: starting connection '<SSID>' (<UUID>)
device (wlan0): state change: disconnected -> prepare (reason 'none', sys-iface-state: 'managed')
manager: NetworkManager state is now CONNECTING
device (wlan0): state change: prepare -> config (reason 'none', sys-iface-state: 'managed')
device (wlan0): new IWD device state is connected
device (wlan0): state change: config -> ip-config (reason 'none', sys-iface-state: 'managed')
dhcp4 (wlan0): activation: beginning transaction (timeout in 45 seconds)
dhcp4 (wlan0): state changed unknown -> bound, address=<IP ADDRESS>
device (wlan0): state change: ip-config -> ip-check (reason 'none', sys-iface-state: 'managed')
device (wlan0): state change: ip-check -> secondaries (reason 'none', sys-iface-state: 'managed')
device (wlan0): state change: secondaries -> activated (reason 'none', sys-iface-state: 'managed')
manager: NetworkManager state is now CONNECTED_LOCAL
manager: NetworkManager state is now CONNECTED_SITE
policy: set '<SSID>' (wlan0) as default for IPv4 routing and DNS
device (wlan0): Activation: successful, device activated.
manager: NetworkManager state is now CONNECTED_GLOBAL

I tried to search the internet for the error message from iwd, but nothing useful came up. Just forum posts with random suggestions like “turn off IPv6” and old kernel bug reports about the Intel wireless drivers exhibiting similar disconnections. 😞

I tried to look up what a modern setup + configuration should look like and tried to combine the guides from Ubuntu and Arch … no change.

The Gentoo Wiki and the iwd Wiki also suggest (wifi.iwd.autoconnect=yes) for NetworkManager. After applying this setting the issue seems to have gone away. 😀

Update 2021-10-31

The last “fix” only lasted for about 9 hours. 😕

I’m now suspecting something with power management 🤔 … I’m still investigating.

Update 2021-11-26

I have a configuration that seems to work for a few weeks now. My final system state was adding

[device]
wifi.backend=iwd
wifi.iwd.autoconnect=yes

to NetworkManager’s configuration, masking wpa_supplicant.service, commenting out the contents of /etc/NetworkManager/conf.d/default-wifi-powersave-on.conf, installing all recommended packages for TLP (i.e. also tlp-rdw) and finally masking Gnome 40’s new power-profiles-daemon.service which seems to interfere with TLP.

I’m not sure if this is the minimal set of changes necessary, but it works for me. 😀 It first started showing the dis-/reconnection notification, but e.g. SSH connections didn’t seem to drop and after a while even the notifications stopped. Logs are also clean. I’m happy. 😀

Howto Restore ZFS Encryption Hierarchies

Backing up encrypted ZFS datasets you’ll see that ZFS breaks up the encryption hierarchy. The backed up datasets will look like they’ve all been encrypted separately. You can still use the (same) original key to unlock all the datasets, but you’ll have to unlock them separately. 😐

This howto should help you bring them back together when you have to restore from a backup.

Assuming we’ve created a new and encrypted pool to restore the previous backup to (I’ll call it new_rpool). We send our data from the backup pool to new_rpool.

sudo zfs send -w -v backup/laptop/rpool/ROOT@zrepl_20210131_223653_000 | sudo zfs receive -v new_rpool/ROOT
sudo zfs send -w -v backup/laptop/rpool/ROOT/ubuntu@zrepl_20210402_113057_000 | sudo zfs receive -v new_rpool/ROOT/ubuntu
[...]

Note that we’re using zfs send -w which sends the encrypted blocks “as is” from the backup pool to new_pool. This means that these datasets can only be decrypted with the key they were originally encrypted with.

Also note that you cannot restore an encrypted root/pool dataset with another encrypted one: i.e. we can’t restore the contents/snapshots of rpool to new_rpool (at least not without decrypting them first on the sender, sending them unencrypted and reencrypting them upon receive). Luckily for me that dataset is empty. 😎

Anyway … our new pool should look something like this now:

$ zfs list -o name,encryption,keystatus,keyformat,keylocation,encryptionroot -t filesystem,volume -r new_rpool
NAME                   ENCRYPTION   KEYSTATUS    KEYFORMAT   KEYLOCATION  ENCROOT
new_rpool              aes-256-gcm  available    passphrase  prompt       new_rpool
new_rpool/ROOT         aes-256-gcm  unavailable  raw         prompt       new_rpool/ROOT
new_rpool/ROOT/ubuntu  aes-256-gcm  unavailable  raw         prompt       new_rpool/ROOT/ubuntu
[...]

Note that each dataset is treated as it is encrypted by itself (visible in the encryptionroot property). To restore our ability to unlock all datasets with a single key we’ll have to to some work.

First we have to unlock each of these datasets. We can do this with the zfs load-key command (my data was encrypted using a raw key in a file, hence the -L file:///...):

sudo zfs load-key -L file:///tmp/backup.key new_rpool/ROOT
sudo zfs load-key -L file:///tmp/backup.key new_rpool/ROOT/ubuntu
[...]

Although zfs load-key is supposed to have a -r option that works when keylocation=prompt it fails for me with the following error message 🤨:

sudo zfs load-key -r -L file:///tmp/backup.key new_rpool/ROOT

alternate keylocation may only be 'prompt' with -r or -a
usage:
        load-key [-rn] [-L <keylocation>] <-a | filesystem|volume>


For the property list, run: zfs set|get


For the delegated permission list, run: zfs allow|unallow

The keystatus should have changed to available now:

$ zfs list -o name,encryption,keystatus,keyformat,keylocation,encryptionroot -t filesystem,volume -r new_rpool
NAME                   ENCRYPTION   KEYSTATUS    KEYFORMAT   KEYLOCATION  ENCROOT
new_rpool              aes-256-gcm  available    passphrase  prompt       new_rpool
new_rpool/ROOT         aes-256-gcm  available    raw         prompt       new_rpool/ROOT
new_rpool/ROOT/ubuntu  aes-256-gcm  available    raw         prompt       new_rpool/ROOT/ubuntu
[...]

We can now change the encryption keys and hierarchy by inheriting them (similar to regular dataset properties):

sudo zfs change-key -l -i new_rpool/ROOT
sudo zfs change-key -l -i new_rpool/ROOT/ubuntu
[...]

When we list our encryption properties now we can see that all the datasets have the same encryptionroot. This means that unlocking it unlocks all the other datasets as well. 🎉

$ zfs list -o name,encryption,keystatus,keyformat,keylocation,encryptionroot -t filesystem,volume -r new_rpool
NAME                   ENCRYPTION   KEYSTATUS    KEYFORMAT   KEYLOCATION  ENCROOT
new_rpool              aes-256-gcm  available    passphrase  prompt       new_rpool
new_rpool/ROOT         aes-256-gcm  available    passphrase  none         new_rpool
new_rpool/ROOT/ubuntu  aes-256-gcm  available    passphrase  none         new_rpool
[...]

Restoring Dataset Properties

This howto doesn’t touch restoring dataset properties, because I’ve not been able to reliably backup dataset properties using the -p and -b options of zfs send. Therefore I make sure that I have a (manual) backup of the dataset properties with something like `zfs get all -s local > zfs_all_local_properties_$(date -Iminutes).txt`

Using WireGuard to Connect my IPv4 Network to the IPv6 Internet

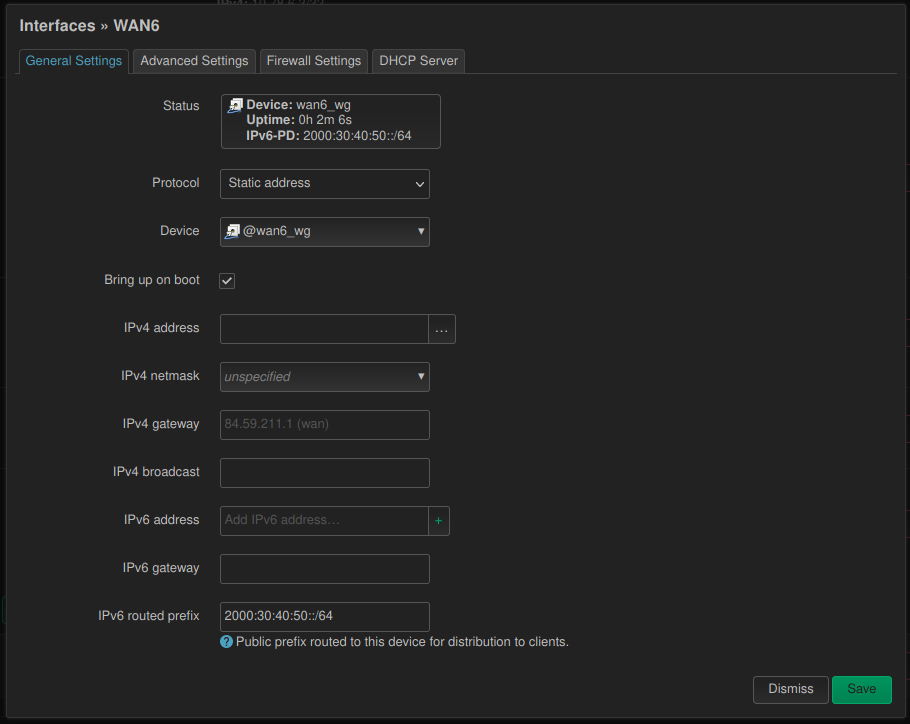
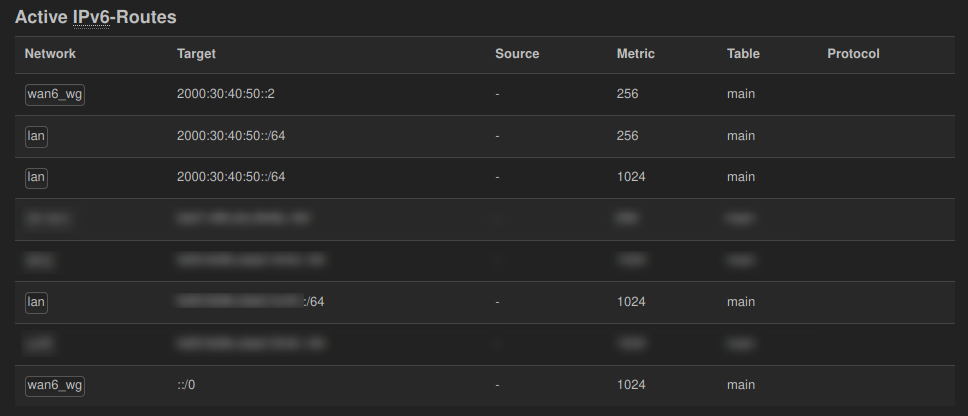
Update 2022-04-04: I’ve updated the article to eliminate NAT on the cloud server side of the VPN. For the router I’ve investigated and tried several solutions.

For a long time I’ve wanted to have a proper IPv6 network at home. Although not always straight forward (because it’s disabled by default or having less capable UI for configuration) I also wanted to be connected to the Internet via IPv6. Although all pieces of my network are IPv6-capable I’m stuck with an ISP that won’t enable it for DSL customers (not even as an “yes, I really want this and I’m willing to deal with the fallout” opt-in). I’ve skimmed NAT64 tutorials for OpenWRT over the years, but most of them were recommending software not updated since 2011. 😨 … and Internet hearsay says: NAT64 is lame! … literally! Implementations seem to prefer IPv4 in the presence of NAT64, because NAT64 is additional complexity on top of IPv4, hence assuming pure IPv4 will be faster).

So a proper IPv6 tunnel it is! It seems all but one 4to6 tunnel brokers have given up … and besides why give someone else your data? I figured a small (~3€/month) server and a little elbow grease would do the job as well. 🤠

The Home Situation

My home network consists of 3 UniFi Access Points, 2 UniFi Switches and a UniFi 3-Port Gateway. As a testament to Ubiquiti’s–at best mediocre–controller UI and basically non-scriptable configuration I’ve always hesitated to embrace it fully. I’ve kept my old–but still supported–OpenWRT router as my DNS server, because in the Unifi world DNS is not configurable beyond a “create DNS entries for DHCP hostnames” switch. Anyway … the Ubiquiti Gateway is connected to the DSL modem, so all IPv4 traffic goes that way.

Conventions

I’ll pretend my current IPv4 network is 10.11.12.0/24 and use the fd00:0011:0012::/48 ULA prefix for the IPv6 configuration. You should generate a random global ID and use it in your configuration. This is meant to prevent clashes when different (i.e. separately maintained) networks are merged at some point. The subnet ID (i.e. the 4th segment) still gives us enough leeway to segment our network and still have full /64s for each of them 😎. We’ll use the 13 segment for the home network (named “LAN”). We’ll assume the WireGuard VPN cloud endpoint has an address and prefix of 2000:30:40:50::1/64.

By convention I’ll use .1 or ::1 to signify the UniFi gateway and .2 or ::2 to signify the OpenWRT router in the home network.

Configuration: UniFi Gear

The Ubiquiti gear needs to at least be aware of the networks that are going to be routed through it. This also means that we have to tell it we want to have an IPv6 network also. But in order to have more control over what comes next I made the OpenWRT router the DHCP server of the network.

UnifI Controller: network configuration

Notice that I turned off UniFi’s DHCP server and not activated any of the IPv6 DHCP or RA features here. A word of warning: whatever you put in the Gateway/Subnet fields UniFi will configure it’s gateway to have that IP address! … why would anyone ever use anything else as a gateway. 😒 Also we won’t need port forwarding, because we’ll have the OpenWRT router connect out.

Configuration: Cloud Server

I chose Hetzner Cloud for my VPN endpoint, as their servers have native IPv6 connections and every server gets a /64. Their smallest server costs around ~3€/month. I chose a Ubuntu 20.04 image and configured an SSH key. We then can log in and install WireGuard and something like UFW:

apt update
apt install linux-image-generic-hwe-20.04
apt full-upgrade
apt install wireguard ufw
# make sure we can still connect via SSH
ufw allow 22/tcp
# start firewall
ufw enable

Now we can configure the WireGuard VPN endpoint. Note that we’ll only configure it for IPv6 connectivity!

# generate keys
wg genkey > wg.key
wg pubkey < wg.key > wg.pub
wg genpsk > wg.psk
# TODO: delete these files when configuration is done!

Create a file /etc/wireguard/wg0.conf with the following content:

[Interface]
# Hetzner Cloud VPN endpoint
Address = 2000:30:40:50::3/64
PrivateKey = <contents of wg.key>
ListenPort = 48158

PreUp = echo 1 > /proc/sys/net/ipv6/conf/all/forwarding
# see https://docs.hetzner.com/robot/dedicated-server/ip/additional-ip-adresses/#subnets
# make sure ...:1 routes to the host device
PreUp = ip route add 2000:30:40:50::1/128 dev eth0
# stop routing the whole prefix to the host interface (will clash with the rule below)
PreUp = ip route del 2000:30:40:50::/64 dev eth0
# route allowed IPs (see below) to the WireGuard interface (will be added automatically)
#PreUp = ip route add 2000:30:40:50::/64 dev %i

# forward incoming or outgoing traffic from/to the WireGuard interface (%i) by default
PostUp = ip6tables -A FORWARD -i %i -j ACCEPT
PostUp = ip6tables -A FORWARD -o %i -j ACCEPT
PostUp = ufw allow 48158/udp

# revert firewall rules
PostDown = ip6tables -D FORWARD -o %i -j ACCEPT
PostDown = ip6tables -D FORWARD -i %i -j ACCEPT
# restore routing for host interface
PostDown = ip route add 2000:30:40:50::/64 dev eth0
PostDown = ip route del 2000:30:40:50::1/128 dev eth0

[Peer]
# OpenWRT router
PublicKey = <get this from the "Configuration" section on the WireGuard Status page of the OpenWRT router>
PresharedKey = <contents of wg.psk>
AllowedIPs = 2000:30:40:50::/64

The ListenPort is arbitrary. We’ll use it across all peers in this WireGuard VPN for consistency. The PreUp lines make sure the kernel allows forwarding network packages in general and changes the routing that only a single address (i.e. 2000:30:40:50::1) is routed to the host and the rest of the /64 is routed to the WireGuard interface. The PostUp lines allow packets from our VPN to reach the Internet as well as allowing the WireGuard connection through the firewall. %i will be replaced with the name of the WireGuard interface (wg0 in our case). You should replace eth0 with the name of the network interface of the host that is connected to the Internet.

Now we can start the WireGuard VPN endpoint and make sure it’s started on boot with the following commands. You can comment out the [Peer] section and start it now or wait until we’re done configuring the OpenWRT router also.

systemctl start wg-quick@wg0.service
systemctl enable wg-quick@wg0.service

Configuration: OpenWRT Router

Connecting to the IPv6 Internet

First we have to install the necessary packages by following the WireGuard Basics guide on the OpenWRT Wiki.

On the “Network > Interfaces” page we add a new interface which I named “wan_wg” using the “WireGuard VPN” protocol. Generate a new private key with the wg genkey command and paste it into the “Private Key” field. Use the same “Listen Port” as for the Cloud VPN endpoint and add 2000:30:40:50::2/64 to the “IP Addresses“.

OpenWRT Router – WireGuard Interface: General Settings

In the “Advanced Settings” tab make sure “Use builtin IPv6-management” is activated.

In the “Firewall Settings” tab assign this interface to the “wan” zone.

In the “Peers” tab add a new peer and fill in the “Public Key” and “Preshared Key” fields with the contents of the wg.pub and wg.psk files of the Cloud VPN endpoint. The “Allowed IPs” should read ::/0. This may be the single most important configuration. This tells the router that if it doesn’t know where to send a specific IPv6 packet (i.e. because it’s not meant for a device on our home network) it should be sent here. Don’t add anything else otherwise the “Route Allowed IPs” option won’t add a route for ::/0 (ask me how I know 😑)! The “Endpoint Host” should contain a stable public IPv4 address or a hostname to reach the Cloud VPN server. In this case Hetzner Cloud servers are assigned a stable IPv4 address on creation. You can also use a dynamic DNS provider in case you don’t have a stable IP.

OpenWRT Router – WireGuard Interface: Peers

If we have done all the above steps and everything went fine … at this point we should be able to connect from the OpenWRT router out to the Internet via IPv6. We can try this out on the “Network > Diagnostics” page or on the command line.

We can successively test connecting to hosts and interfaces (via ping6 or traceroute6) “further” away:

  • ping6 2000:30:40:50::2 # the OpenWRT router’s WireGuard address; this side of the tunnel is up
  • ping6 2000:30:40:50::3 # the Cloud VPN endpoint’s WireGuard address; we can reach the other end of the tunnel
  • ping6 2000:30:40:50::1 # we can get “out” of the tunnel
  • ping6 2a00:1450:4001:830::200e # we can connect to the IPv6 Internet (e.g. ipv6.google.com)
  • ping6 ipv6.google.com # even IPv6 name resolution works

Making our home network IPv6

Now that we can connect out (at least from the OpenWRT router) we still need to make the rest of our home network IPv6 aware. This is the reason I didn’t want the UniFi gear to be the DHCP server in the network any more. With OpenWRT we have much more control over what happens.

To achieve this we have to first tell OpenWRT our “IPv6 ULA-Prefix“. We do this on the “Network > Interfaces” page on the “Global network options” tab. As described above we use fd00:11:12::/48 here. Make sure the first 3 segments are the same on all the IPv6 addresses you configure with this tutorial!

After this we go back to the “Interfaces” tab and edit the “LAN” network. On the “General Settings” tab we set the “Protocol” to “Static address“, the “IPv6 assignment length” to 64, the “IPv6 assignment hint” to 13 (this will become the 4 segment in our IPv6 addresses) and “IPv6 suffix” to ::2.

OpenWRT – LAN Interface: General Settings

On the “Advanced Settings” tab we make sure to have “Use builtin IPv6-management” enabled.

Now we go to the “DHCP Server” tab. On its “General Setup” tab we make sure “Ignore interface” is disabled. On the “IPv6 Settings” tab set “Router Advertisement-Service” and “DHCPv6-Service” to “server mode“, “NDP-Proxy” to “disabled” and “DHCPv6-Mode” to “stateless + stateful“. The most important setting is enabling “Always announce default router“. This makes sure that the OpenWRT router announces to the home network that it is the default router (for IPv6). This is necessary because we use local addresses (i.e. starting with fd...) instead of handing down the public prefix our Cloud VPN endpoint was assigned. (Update: we can delegate the VPN’s public prefix, but since we only have a /64 prefix it will be assigned to only one of our networks basically at random. All others won’t be able to use it. I had the wrong impression that I could use any prefix and segment it for my networks, but it seems /64 prefix is the maximum possible when you want to use common/standard tools. The only “non-standard” way I currently know is Docker which is able to utilize prefixes as long as /80 for its networks and containers.)

OpenWRT – LAN Interface: DHCP IPv6 Settings

This should do the trick. Now other devices on the network should be getting IPv6 addresses from the fd00:11:12:13::/64 address range (check e.g. with ip -6 a). You may need to disconnect and then connect to the network again for the changes to be picked up.

Now you can do the same pinging/tracerouting procedure we did on the OpenWRT router.

Some NAT

During my testing I was not able to ping the Cloud VPN endpoint’s WireGuard interface from my laptop. No amount of config jiggling on the OpenWRT router was helping getting the packages further than its WireGuard interface (i.e. 2000:30:40:50::2). Although I thought we could get by without using NAT 😓.

So I (begrudgingly) did what the NAT6 and IPv6 masquerading page on the OpenWRT Wiki said and lo and behold it worked. 😂

Update 2022-04-04: I’ve investigated this further and came up with several solutions.

Shortcomings

I’m mostly unhappy about the NAT. I’d like to get rid of it completely hopefully when I find a good way to buy/configure/hand down a larger public prefix assigned to the Cloud VPN endpoint. I’m still figuring out how to properly propagate through WireGuard and the home network (preferably) using the built-in prefix delegation mechanism. Help or ideas would be appreciated on this topic. 😅

My second point of grief is that all external traffic is routed through the <public prefix>::2 address although we have a whole /64 subnet. Somehow routing through the WireGuard network maps all address to ::2 negating the benefit of the masq6_privacy option on the “wan” firewall interface. 😞

Update 2022-02-21: NieX0 in a comment below has instructions for using prefix translation instead of masquerading which I consider a step into the right direction. 😀

Update 2022-04-04: I’ve investigated this further and came up with several solutions.

Troubleshooting

Here are some tips to troubleshoot issues with this setup.

EUI64 addresses

You should put the last two segments of the LAN interface’s MAC address (looking like aa:bb:cc:dd:ee:ff) to memory as IPv6 devices use addresses derived from the MAC address (e.g something like fd00:11:12:13:a8bb:ccff:fedd:eeff or fe80::a8bb:ccff:fedd:eeff). Even if we’ve assigned specific addresses to specific devices or interfaces these addresses will still come up in routing or debugging output. There’re tools that help with converting MAC address + IPv6 network prefix into the final IPv6 addresses.

Checking IPv6 addresses

We can use ip -6 a to check what IPv6 address are assigned to interfaces on specific devices. Beware these can be quite a few. Check if the network prefixes (i.e. the first 4 segments of the IPv6 address) match what we have configured for our networks (and also the fe80:... addresses). Then we look at the host part (i.e. the last 4 segments of the IPv6 address) for the ones we’ve assigned manually or for the EUI64 addresses mentioned above. These will help us identify if our devices got any the IPv6 configuration right.

Checking IPv6 routes

We can use ip -6 r to check if our devices have the right routes configured. The most important one to look out for is the one starting with default via ... . It should point to one if the addresses of the OpenWRT router. We can also use traceroute6 to see what devices the packages go through.

More advanced debugging

Sometimes it helps watching what traffic goes through a specific interface. There’s an awesome blog post describing how to live-capture packages from remote devices (using only tcpdump and ssh) and analyzing them in Wireshark. Our interface names would be wan_wg on the OpenWRT router or wg0 on the Cloud VPN endpoint.

Moving Passwords From Firefox (Lockwise) to KeePassXC

Update 2021-03-27: Good news, it seems KeepassXC 2.7.0 learned to import Firefox timestamps. 😀

Go to about:logins in Firefox.

Click on the three dots in the top right corner, select “Export Logins…” and save your passwords info a CSV file (e.g. exported_firefox_logins.csv).

There’s one complication: Firefox will save dates as Unix timestamps (with millisecond resolution) which KeePassXC doesn’t understand, so we’ll have to help it out.

Save the following script into a file (e.g. firefox_csv_date_fix.py).

#!/usr/bin/env python3
#
# Author: Riyad Preukschas <riyad@informatik.uni-bremen.de>
# License: Mozilla Public License 2.0
# SPDX-License-Identifier: MPL-2.0


import csv
import sys

from datetime import datetime


def main():
    if len(sys.argv) != 2:
        print("Usage: {} <exported_firefox_logins.csv>".format(sys.argv[0]), file=sys.stderr)
        exit(1)

    csv_file_name = sys.argv[1]

    with open(csv_file_name, 'rt') as f:
        # field names will be determined from first row
        csv_reader = csv.DictReader(f)
        # read all rows in one go
        rows = list(csv_reader)

    # add new columns with Iso-formatted dates
    for row in rows:
        row['timeCreatedIso'] = datetime.fromtimestamp(int(row['timeCreated'])/1000).isoformat()
        row['timeLastUsedIso'] = datetime.fromtimestamp(int(row['timeLastUsed'])/1000).isoformat()
        row['timePasswordChangedIso'] = datetime.fromtimestamp(int(row['timePasswordChanged'])/1000).isoformat()

    # write out the updated rows
    csv_writer = csv.DictWriter(sys.stdout, fieldnames=rows[0].keys())
    csv_writer.writeheader()
    csv_writer.writerows(rows)


if __name__ == '__main__':
    main()

Call it giving it the path of the exported_firefox_logins.csv file and redirect the output into a new file:

python3 ./firefox_csv_date_fix.py ./exported_firefox_logins.csv > ./fixed_firefox_logins.csv

It will add new columns (named: old column name + “Iso”) with the dates converted to the ISO 8601 format KeePassXC wants.

We can now use the fixed_firefox_logins.csv file to import the logins into KeePassXC.

Select Database -> Import -> CSV File... from the menu.

It will ask you to create a new database. Just do it you can get the data into your default database later (e.g. call it firefox_logins.kdbx for now).

In the import form select “First line has field names” and match up KeePassXC’s fields with the columns from the CSV:

KeePassXC FieldFirefox CSV ColumnNotes
GroupNot Present
TitleurlFirefox doesn’t have a title field so we use the URL for it.
Usernameusername
Passwordpassword
URLurl
NoteshttpRealmI’m not sure how KeePassXC deals with HTTP authentication. There’s no special field for it, so I decided to keep it in the Notes field.
TOTPNot Present
IconNot Present
Last ModifiedtimePasswordChangedIsothe “Iso” part is important!
CreatedtimeCreatedIsothe “Iso” part is important!

Have a look at the preview at the bottom. Does the data look sane? 🤨

Sadly KeePassXC doesn’t let us import Firefox’s timeLastUsedIso field into its Accessed field. 😑

All your imported Logins will be inside the “Root” group. I’d suggest creating a new group (e.g. “Firefox Import”) and moving all imported Logins into it.

You can now open your default database and use the Database -> Merge From Database ... menu item, select the firefox_logins.kdbx file to include it’s contents into the current database. You’ll see a new “Firefox Imports” group show up.

You can now move the single entries into the appropriate groups if you want (e.g. “KeePassXC-Browser Passwords” if you use the browser extension).

Usefulness of Swap Explained

Chris Down explains how swap’s main role is being the missing backing store for anonymous (i.e. allocated by malloc) pages. While all other kinds of data (e.g. paged-in files) can be reclaimed easily and later reloaded, because their “source of truth” is elsewhere. There’s no such source for anonymous pages hence these pages can “never” be reclaimed unless there’s swap space available (even if those pages aren’t “hot”).

Linux has historically had poor swap (and by extension OOM) handling with few and imprecise means for configuration. Chris describes the behavior of a machine with and without swap in different scenarios of memory contention. He thinks that poor swap performance is caused by having a poor measure of “memory pressure.” He explains how work on cgroups v2 might give the kernel (and thus admins) better measures for memory pressure and knobs for dealing with it.

Moving LXD Containers From One Pool to Another

When I started playing with LXD I just accepted the default storage configuration which creates an image file and uses that to initialize a ZFS pool. Since I’m using ZFS as my main file system this seemed silly as LXD can use an existing dataset as a source for a storage pool. So I wanted to migrate my existing containers to the new storage pool.

Although others seemed to to have the same problem there was no ready answer. Digging through the documentation I finally found out that the lxc move  command had a -s  option … I had an idea. ? Here’s what I came up with …

Preparation

First we create the dataset on the existing ZFS pool and add it to LXC.

sudo zfs create -o mountpoint=none mypool/lxd
lxc storage create pool2 zfs source=mypool/lxd

lxc storage list should show something like this now:

+-------+-------------+--------+--------------------+---------+
| NAME  | DESCRIPTION | DRIVER |       SOURCE       | USED BY |
+-------+-------------+--------+--------------------+---------+
| pool1 |             | zfs    | /path/to/pool1.img | 2       |
+-------+-------------+--------+--------------------+---------+
| pool2 |             | zfs    | mypool/lxd         | 0       |
+-------+-------------+--------+--------------------+---------+

pool1 is the old pool backed by the image file and is used by some containers at the moment as can be seen in the “Used By” column. pool2 is added by not used by any contaiers yet.

Moving

We now try to move our containers to pool2.

# move container to pool2
lxc move some_container some_container-moved -s=pool2
# rename container back for sanity ;)
lxc move some_container-moved some_container

We can check with lxc storage list whether we succeeded.

+-------+-------------+--------+--------------------+---------+
| NAME  | DESCRIPTION | DRIVER |       SOURCE       | USED BY |
+-------+-------------+--------+--------------------+---------+
| pool1 |             | zfs    | /path/to/pool1.img | 1       |
+-------+-------------+--------+--------------------+---------+
| pool2 |             | zfs    | mypool/lxd         | 1       |
+-------+-------------+--------+--------------------+---------+

Indeed pool2 is beeing used now. ? Just to be sure we check that zfs list -r mypool/lxd  also reflects this.

NAME                                  USED  AVAIL  REFER  MOUNTPOINT
mypool/lxd/containers                 1,08G  92,9G    24K  none
mypool/lxd/containers/some_container  1,08G  92,9G   704M  /var/snap/lxd/common/lxd/storage-pools/pool2/containers/some_container
mypool/lxd/custom                       24K  92,9G    24K  none
mypool/lxd/deleted                      24K  92,9G    24K  none
mypool/lxd/images                       24K  92,9G    24K  none
mypool/lxd/snapshots                    24K  92,9G    24K  none

Awesome!

⚠ Note that this only moves the container, but not the LXC image it was cloned off of.

We can repeat this until all containers we care about are moved over to pool2.

Cleanup

To prevent new containers to use pool1  we have to edit the default  profile.

# change devices.root.pool to pool2
lxc profile edit default

Finally …. when we’re happy with the migration and we’ve verified that everything works as expected we can now remove pool1.

lxc storage rm pool1


Backup And Restore Your Android Phone With ADB (And rsync)

Based on my previous scripts and inspired by two blog posts that I stumbled upon I tackled the “backup all my apps, settings and data” problem for my Android devices again. The “new” solutions both use

rsync

  instead of

adb pull

  for file transfers. They both use ADB to start a rsync daemon on the device, forward its ports to localhost and run rsync against it from your host.

Simon’s solution assumes your phone has rsync already (e.g. because you run CyanogenMod) and can become root via

adb root

. It clones all files from the phone (minus

/dev

 ,

/sys

 ,

/proc

  etc.). He also configures udev to start the backup automatically when the phone is plugged in.

pts solves the setup without necessarily becoming root. He also has a way of providing a rsync binary to phones that don’t have any (e.g. when running OxygenOS). He also has a few tricks on how to debug the rsync daemon setup on the phone.

I’ve tried to combine both methods. My approach doesn’t require adb or rsync to be run as root. It’ll use the the system’s rsync when available or temporarily upload and use a backup one extracted from Cyanogen OS (for my OnePlus One). Android won’t allow you to 

chmod +x

a file uploaded to

/sdcard

, but in

/data/local/tmp

it works. ?

The scripts will currently only backup and restore all of your 

/sdcard

directory. Assuming you’re also using something like Titanium Backup you’ll be able to backup and restore all your apps, settings and data. To reduce the amount of data to copy it uses rsync filters to exclude caches and other files that you definitely don’t want synced (

.DS_Store

  files anyone?).

At the moment there’s one caveat: I had to disable restoring modification times (i.e. use

--no-times

 ) because of an obnoxious error (they will be backuped fine, only restoring is the problem): ?

mkstemp “…” (in root) failed: Operation not permitted (1)

Additionally if you’re on the paranoid side you can also build your own rsync for Android to use as the backup binary.

The code and a ton of documentation can be found on GitHub. Comments and suggestions are welcome. ?

Build Rsync for Android Yourself

To build rsync for Android you’ll need to have the Android NDK installed already.

Then clone the rsync for android source (e.g. from CyanogenMod LineageOS) …

git clone https://github.com/LineageOS/android_external_rsync.git
cd android_external_rsync
# checkout the most recent branch
git checkout cm-14.1

… create the missing

jni/Application.mk

build file (e.g. from this Gist) and adapt it to your case

… and start the build with

export NDK_PROJECT_PATH=pwd ndk-build -d rsync

You’ll find your self-build rsync in

obj/local/*/rsync

. ?

Update 2017-10-06:

  • Updated sources from CyanogenMod to LineageOS.
  • Added links to Gist and Andoid NDK docs
  • Updated steps to work with up-to-date setups

If you get something like the following warnings and errors …

[...]
./flist.c:454:16: warning: implicit declaration of function 'major' is invalid in C99
      [-Wimplicit-function-declaration]
                        if ((uint32)major(rdev) == rdev_major)
                                    ^
./flist.c:458:41: warning: implicit declaration of function 'minor' is invalid in C99
      [-Wimplicit-function-declaration]
                        if (protocol_version < 30 && (uint32)minor(rdev) <= 0xFFu)
                                                             ^
./flist.c:467:11: warning: implicit declaration of function 'makedev' is invalid in C99
      [-Wimplicit-function-declaration]
                        rdev = MAKEDEV(major(rdev), 0);
                               ^
./rsync.h:446:36: note: expanded from macro 'MAKEDEV'
#define MAKEDEV(devmajor,devminor) makedev(devmajor,devminor)
                                   ^
3 warnings generated.
[...]
./flist.c:473: error: undefined reference to 'makedev'
./flist.c:454: error: undefined reference to 'major'
./flist.c:457: error: undefined reference to 'major'
./flist.c:458: error: undefined reference to 'minor'
./flist.c:467: error: undefined reference to 'major'
./flist.c:467: error: undefined reference to 'makedev'
./flist.c:617: error: undefined reference to 'major'
./flist.c:619: error: undefined reference to 'minor'
./flist.c:621: error: undefined reference to 'minor'
./flist.c:788: error: undefined reference to 'makedev'
./flist.c:869: error: undefined reference to 'makedev'
./flist.c:1027: error: undefined reference to 'minor'
clang++: error: linker command failed with exit code 1 (use -v to see invocation) 
make: *** [obj/local/armeabi-v7a/rsync] Error 1

… you probably need to update

config.h

and change

/* #undef MAJOR_IN_SYSMACROS */

to

#define MAJOR_IN_SYSMACROS 1

.