Update 2022-04-04: I’ve updated the article to eliminate NAT on the cloud server side of the VPN. For the router I’ve investigated and tried several solutions.
For a long time I’ve wanted to have a proper IPv6 network at home. Although not always straight forward (because it’s disabled by default or having less capable UI for configuration) I also wanted to be connected to the Internet via IPv6. Although all pieces of my network are IPv6-capable I’m stuck with an ISP that won’t enable it for DSL customers (not even as an “yes, I really want this and I’m willing to deal with the fallout” opt-in). I’ve skimmed NAT64 tutorials for OpenWRT over the years, but most of them were recommending software not updated since 2011. 😨 … and Internet hearsay says: NAT64 is lame! … literally! Implementations seem to prefer IPv4 in the presence of NAT64, because NAT64 is additional complexity on top of IPv4, hence assuming pure IPv4 will be faster).
So a proper IPv6 tunnel it is! It seems all but one 4to6 tunnel brokers have given up … and besides why give someone else your data? I figured a small (~3€/month) server and a little elbow grease would do the job as well. 🤠
The Home Situation
My home network consists of 3 UniFi Access Points, 2 UniFi Switches and a UniFi 3-Port Gateway. As a testament to Ubiquiti’s–at best mediocre–controller UI and basically non-scriptable configuration I’ve always hesitated to embrace it fully. I’ve kept my old–but still supported–OpenWRT router as my DNS server, because in the Unifi world DNS is not configurable beyond a “create DNS entries for DHCP hostnames” switch. Anyway … the Ubiquiti Gateway is connected to the DSL modem, so all IPv4 traffic goes that way.
Conventions
I’ll pretend my current IPv4 network is 10.11.12.0/24 and use the fd00:0011:0012::/48 ULA prefix for the IPv6 configuration. You should generate a random global ID and use it in your configuration. This is meant to prevent clashes when different (i.e. separately maintained) networks are merged at some point. The subnet ID (i.e. the 4th segment) still gives us enough leeway to segment our network and still have full /64s for each of them 😎. We’ll use the 13 segment for the home network (named “LAN”). We’ll assume the WireGuard VPN cloud endpoint has an address and prefix of 2000:30:40:50::1/64.
By convention I’ll use .1 or ::1 to signify the UniFi gateway and .2 or ::2 to signify the OpenWRT router in the home network.
Configuration: UniFi Gear
The Ubiquiti gear needs to at least be aware of the networks that are going to be routed through it. This also means that we have to tell it we want to have an IPv6 network also. But in order to have more control over what comes next I made the OpenWRT router the DHCP server of the network.
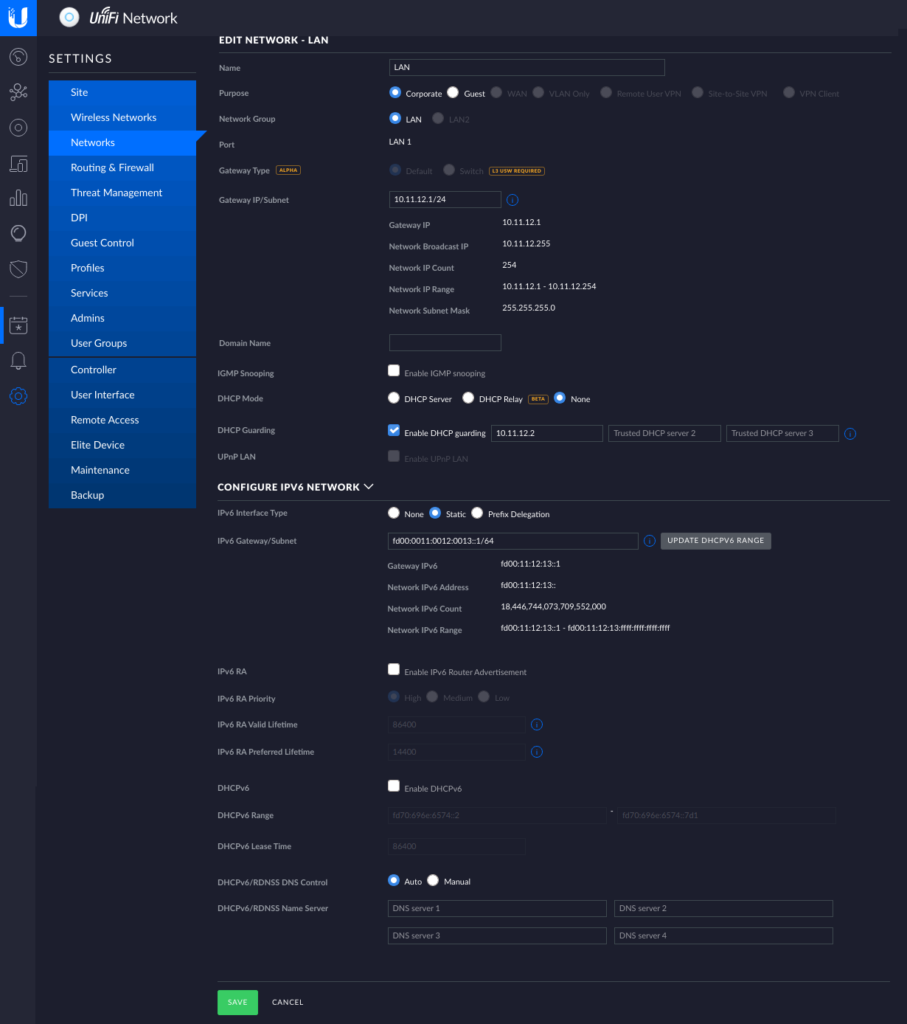
Notice that I turned off UniFi’s DHCP server and not activated any of the IPv6 DHCP or RA features here. A word of warning: whatever you put in the Gateway/Subnet fields UniFi will configure it’s gateway to have that IP address! … why would anyone ever use anything else as a gateway. 😒 Also we won’t need port forwarding, because we’ll have the OpenWRT router connect out.
Configuration: Cloud Server
I chose Hetzner Cloud for my VPN endpoint, as their servers have native IPv6 connections and every server gets a /64. Their smallest server costs around ~3€/month. I chose a Ubuntu 20.04 image and configured an SSH key. We then can log in and install WireGuard and something like UFW:
apt update
apt install linux-image-generic-hwe-20.04
apt full-upgrade
apt install wireguard ufw
# make sure we can still connect via SSH
ufw allow 22/tcp
# start firewall
ufw enable
Now we can configure the WireGuard VPN endpoint. Note that we’ll only configure it for IPv6 connectivity!
# generate keys
wg genkey > wg.key
wg pubkey < wg.key > wg.pub
wg genpsk > wg.psk
# TODO: delete these files when configuration is done!
Create a file /etc/wireguard/wg0.conf with the following content:
[Interface]
# Hetzner Cloud VPN endpoint
Address = 2000:30:40:50::3/64
PrivateKey = <contents of wg.key>
ListenPort = 48158

PreUp = echo 1 > /proc/sys/net/ipv6/conf/all/forwarding
# see https://docs.hetzner.com/robot/dedicated-server/ip/additional-ip-adresses/#subnets
# make sure ...:1 routes to the host device
PreUp = ip route add 2000:30:40:50::1/128 dev eth0
# stop routing the whole prefix to the host interface (will clash with the rule below)
PreUp = ip route del 2000:30:40:50::/64 dev eth0
# route allowed IPs (see below) to the WireGuard interface (will be added automatically)
#PreUp = ip route add 2000:30:40:50::/64 dev %i

# forward incoming or outgoing traffic from/to the WireGuard interface (%i) by default
PostUp = ip6tables -A FORWARD -i %i -j ACCEPT
PostUp = ip6tables -A FORWARD -o %i -j ACCEPT
PostUp = ufw allow 48158/udp

# revert firewall rules
PostDown = ip6tables -D FORWARD -o %i -j ACCEPT
PostDown = ip6tables -D FORWARD -i %i -j ACCEPT
# restore routing for host interface
PostDown = ip route add 2000:30:40:50::/64 dev eth0
PostDown = ip route del 2000:30:40:50::1/128 dev eth0

[Peer]
# OpenWRT router
PublicKey = <get this from the "Configuration" section on the WireGuard Status page of the OpenWRT router>
PresharedKey = <contents of wg.psk>
AllowedIPs = 2000:30:40:50::/64
The ListenPort is arbitrary. We’ll use it across all peers in this WireGuard VPN for consistency. The PreUp lines make sure the kernel allows forwarding network packages in general and changes the routing that only a single address (i.e. 2000:30:40:50::1) is routed to the host and the rest of the /64 is routed to the WireGuard interface. The PostUp lines allow packets from our VPN to reach the Internet as well as allowing the WireGuard connection through the firewall. %i will be replaced with the name of the WireGuard interface (wg0 in our case). You should replace eth0 with the name of the network interface of the host that is connected to the Internet.
Now we can start the WireGuard VPN endpoint and make sure it’s started on boot with the following commands. You can comment out the [Peer] section and start it now or wait until we’re done configuring the OpenWRT router also.
systemctl start wg-quick@wg0.service
systemctl enable wg-quick@wg0.service
Configuration: OpenWRT Router
Connecting to the IPv6 Internet
First we have to install the necessary packages by following the WireGuard Basics guide on the OpenWRT Wiki.
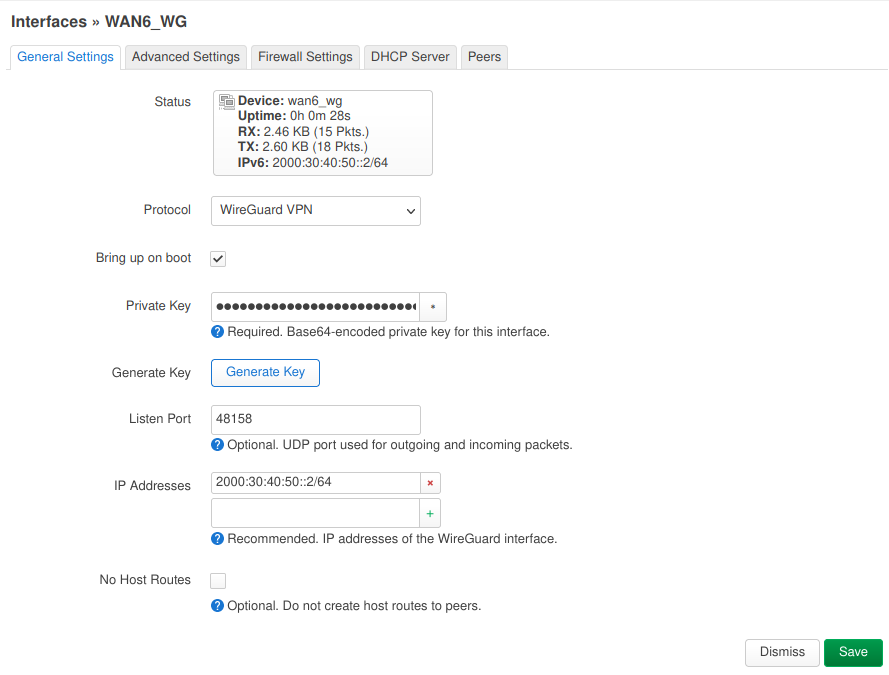
On the “Network > Interfaces” page we add a new interface which I named “wan_wg” using the “WireGuard VPN” protocol. Generate a new private key with the wg genkey command and paste it into the “Private Key” field. Use the same “Listen Port” as for the Cloud VPN endpoint and add 2000:30:40:50::2/64 to the “IP Addresses“.
In the “Advanced Settings” tab make sure “Use builtin IPv6-management” is activated.
In the “Firewall Settings” tab assign this interface to the “wan” zone.
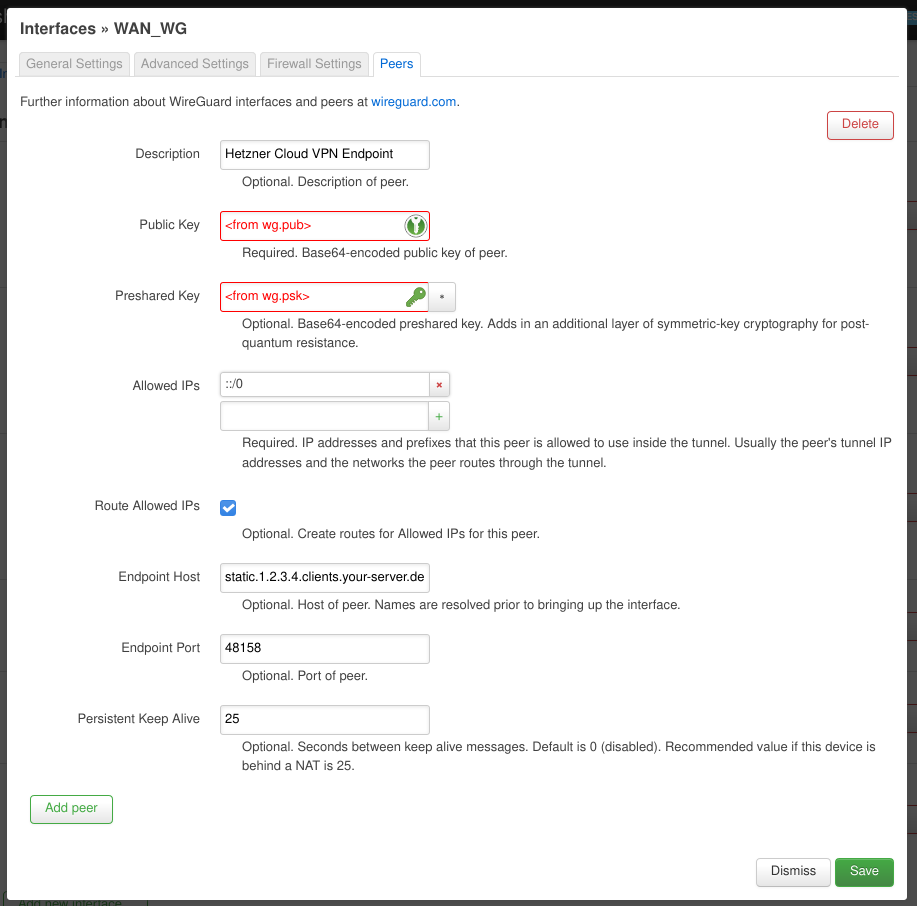
In the “Peers” tab add a new peer and fill in the “Public Key” and “Preshared Key” fields with the contents of the wg.pub and wg.psk files of the Cloud VPN endpoint. The “Allowed IPs” should read ::/0. This may be the single most important configuration. This tells the router that if it doesn’t know where to send a specific IPv6 packet (i.e. because it’s not meant for a device on our home network) it should be sent here. Don’t add anything else otherwise the “Route Allowed IPs” option won’t add a route for ::/0 (ask me how I know 😑)! The “Endpoint Host” should contain a stable public IPv4 address or a hostname to reach the Cloud VPN server. In this case Hetzner Cloud servers are assigned a stable IPv4 address on creation. You can also use a dynamic DNS provider in case you don’t have a stable IP.
If we have done all the above steps and everything went fine … at this point we should be able to connect from the OpenWRT router out to the Internet via IPv6. We can try this out on the “Network > Diagnostics” page or on the command line.
We can successively test connecting to hosts and interfaces (via ping6 or traceroute6) “further” away:
ping6 2000:30:40:50::2# the OpenWRT router’s WireGuard address; this side of the tunnel is upping63 # the Cloud VPN endpoint’s WireGuard address; we can reach the other end of the tunnel2000:30:40:50::ping612000:30:40:50::#we can get “out” of the tunnelping6 2a00:1450:4001:830::200e# we can connect to the IPv6 Internet (e.g. ipv6.google.com)ping6 ipv6.google.com# even IPv6 name resolution works
Making our home network IPv6
Now that we can connect out (at least from the OpenWRT router) we still need to make the rest of our home network IPv6 aware. This is the reason I didn’t want the UniFi gear to be the DHCP server in the network any more. With OpenWRT we have much more control over what happens.
To achieve this we have to first tell OpenWRT our “IPv6 ULA-Prefix“. We do this on the “Network > Interfaces” page on the “Global network options” tab. As described above we use fd00:11:12::/48 here. Make sure the first 3 segments are the same on all the IPv6 addresses you configure with this tutorial!
After this we go back to the “Interfaces” tab and edit the “LAN” network. On the “General Settings” tab we set the “Protocol” to “Static address“, the “IPv6 assignment length” to 64, the “IPv6 assignment hint” to 13 (this will become the 4 segment in our IPv6 addresses) and “IPv6 suffix” to ::2.
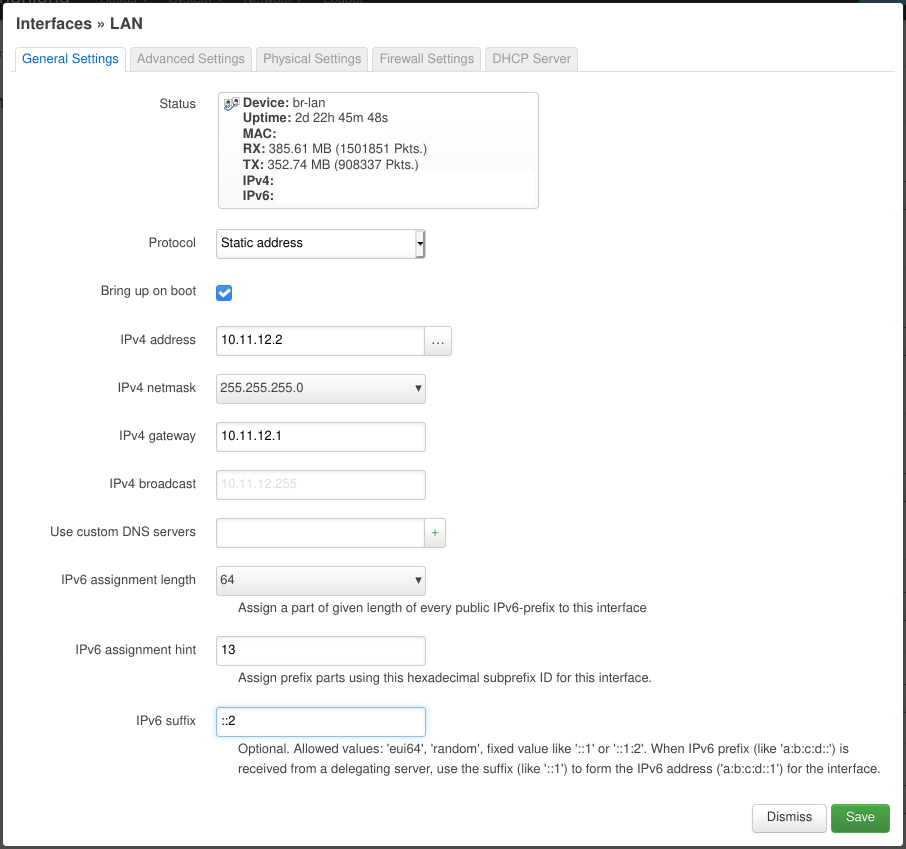
On the “Advanced Settings” tab we make sure to have “Use builtin IPv6-management” enabled.
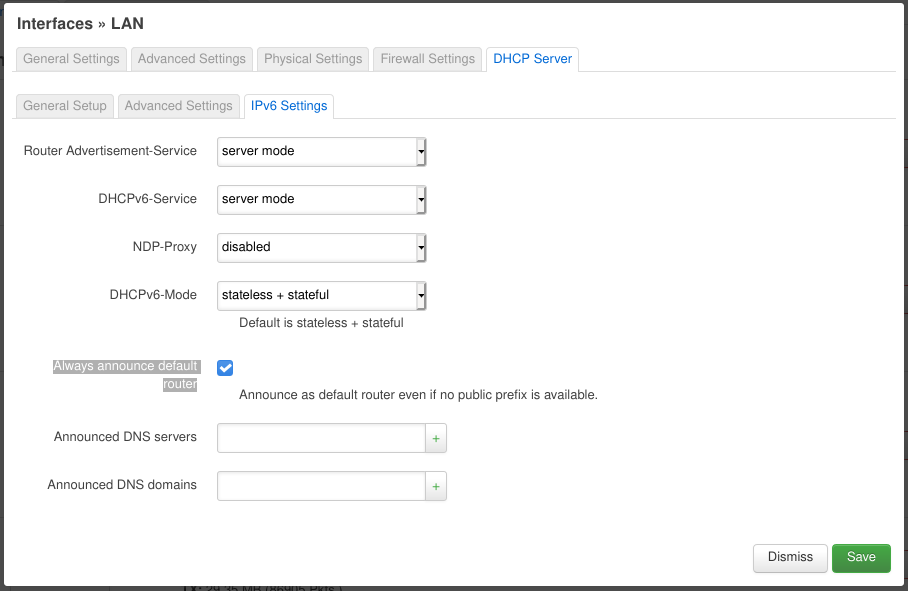
Now we go to the “DHCP Server” tab. On its “General Setup” tab we make sure “Ignore interface” is disabled. On the “IPv6 Settings” tab set “Router Advertisement-Service” and “DHCPv6-Service” to “server mode“, “NDP-Proxy” to “disabled” and “DHCPv6-Mode” to “stateless + stateful“. The most important setting is enabling “Always announce default router“. This makes sure that the OpenWRT router announces to the home network that it is the default router (for IPv6). This is necessary because we use local addresses (i.e. starting with fd...) instead of handing down the public prefix our Cloud VPN endpoint was assigned. (Update: we can delegate the VPN’s public prefix, but since we only have a /64 prefix it will be assigned to only one of our networks basically at random. All others won’t be able to use it. I had the wrong impression that I could use any prefix and segment it for my networks, but it seems /64 prefix is the maximum possible when you want to use common/standard tools. The only “non-standard” way I currently know is Docker which is able to utilize prefixes as long as /80 for its networks and containers.)
This should do the trick. Now other devices on the network should be getting IPv6 addresses from the fd00:11:12:13::/64 address range (check e.g. with ip -6 a). You may need to disconnect and then connect to the network again for the changes to be picked up.
Now you can do the same pinging/tracerouting procedure we did on the OpenWRT router.
Some NAT
During my testing I was not able to ping the Cloud VPN endpoint’s WireGuard interface from my laptop. No amount of config jiggling on the OpenWRT router was helping getting the packages further than its WireGuard interface (i.e. 2000:30:40:50::2). Although I thought we could get by without using NAT 😓.
So I (begrudgingly) did what the NAT6 and IPv6 masquerading page on the OpenWRT Wiki said and lo and behold it worked. 😂
Update 2022-04-04: I’ve investigated this further and came up with several solutions.
Shortcomings
I’m mostly unhappy about the NAT. I’d like to get rid of it completely hopefully when I find a good way to buy/configure/hand down a larger public prefix assigned to the Cloud VPN endpoint. I’m still figuring out how to properly propagate through WireGuard and the home network (preferably) using the built-in prefix delegation mechanism. Help or ideas would be appreciated on this topic. 😅
My second point of grief is that all external traffic is routed through the <public prefix>::2 address although we have a whole /64 subnet. Somehow routing through the WireGuard network maps all address to ::2 negating the benefit of the masq6_privacy option on the “wan” firewall interface. 😞
Update 2022-02-21: NieX0 in a comment below has instructions for using prefix translation instead of masquerading which I consider a step into the right direction. 😀
Update 2022-04-04: I’ve investigated this further and came up with several solutions.
Troubleshooting
Here are some tips to troubleshoot issues with this setup.
EUI64 addresses
You should put the last two segments of the LAN interface’s MAC address (looking like aa:bb:cc:dd:ee:ff) to memory as IPv6 devices use addresses derived from the MAC address (e.g something like fd00:11:12:13:a8bb:ccff:fedd:eeff or fe80::a8bb:ccff:fedd:eeff). Even if we’ve assigned specific addresses to specific devices or interfaces these addresses will still come up in routing or debugging output. There’re tools that help with converting MAC address + IPv6 network prefix into the final IPv6 addresses.
Checking IPv6 addresses
We can use ip -6 a to check what IPv6 address are assigned to interfaces on specific devices. Beware these can be quite a few. Check if the network prefixes (i.e. the first 4 segments of the IPv6 address) match what we have configured for our networks (and also the fe80:... addresses). Then we look at the host part (i.e. the last 4 segments of the IPv6 address) for the ones we’ve assigned manually or for the EUI64 addresses mentioned above. These will help us identify if our devices got any the IPv6 configuration right.
Checking IPv6 routes
We can use ip -6 r to check if our devices have the right routes configured. The most important one to look out for is the one starting with default via ... . It should point to one if the addresses of the OpenWRT router. We can also use traceroute6 to see what devices the packages go through.
More advanced debugging
Sometimes it helps watching what traffic goes through a specific interface. There’s an awesome blog post describing how to live-capture packages from remote devices (using only tcpdump and ssh) and analyzing them in Wireshark. Our interface names would be wan_wg on the OpenWRT router or wg0 on the Cloud VPN endpoint.
